Variants & Options - Miscellaneous Functionality
This functionality is only available, if variants/options have been defined in the project!
Displaying / Hiding Variants/Options
The variants'/options' visibility can be defined in the Project Window's Variants/Options tab by checking/unchecking the checkbox in front of the corresponding variant/option.
Or right-click on the corresponding variant/option and select the Properties command from the displayed context menu. The dialog enables to display or hide the existing variants/options.
Tooltips for Information on Variants/Options
Working with variants/options can be very confusing as it is not displayed what is set for the individual components and connections.
Therefore tooltips always display the current settings of the object, which is touched by the cursor.
Display of the tooltips, however, has to be set first using the option Tools -> Settings -> Variants/Options -> Display -> Show info in tooltips.

Note
-
The display differentiates between variants and options. If e.g. no variant definition exists the line will not be displayed (correspondingly applies for options).
-
Tooltips on connection lines differentiate between connection, conductor/wire and cable information. Referring to connection lines this is always clear. Concerning cables and wires several tooltips may be contained. In this case the following note will be displayed <more than one object>.
Display all full variant/option names as updated
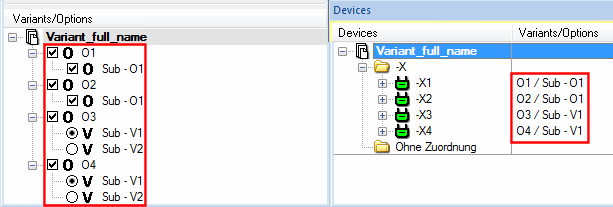
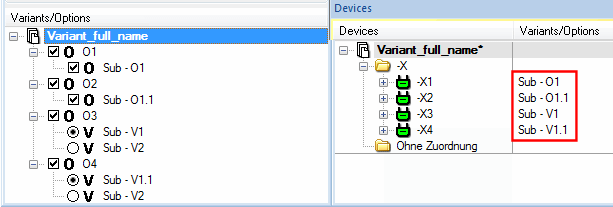
Full (fully qualified) variant/option names are used in the variant information at sub-variants/options which are not unique. This will be the case, when a sub-variant/option is multiply existing with the same name in project.
To be able to distinguish between these sub-variants/options, the full variant/option name is displayed as follows:
Example
Variant/Option (Level 1) / Sub-Variant/Option (Level 2) // Sub-Variant/Option Level 3) and so on
When the sub-variant/option name is renamed or deleted, the full variant/option name can be updated in the variant information. For this purpose, there is the command Recalculation Variant/Option Full Name
To recalculate the full variant/option names, proceed as follows:
-
right-click on the project name in the Variants/Options Tree,
-
select the context menu command Recalculation Variant/Option Full Name
Example
The examples show sub-variants/options that exist multiple times:
-
Sub - O1 (is contained in O1 & O2)
-
Sub - V1 (is contained in O1 & O2)
Renaming the sub-variants/options makes them unique, however, the full variant/option name still exists in the variant information:
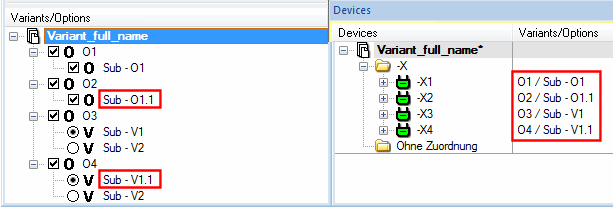
If the command Recalculation Variant/Option Full Name is executed, the general naming is used instead of the full variant/option name in the variant information:
Displaying Objects with Variants/Options in alternative Color
Particularly if certain variants/options are set invisible and are only displayed grayed out, it is complicated to get the inactive information. That is why the user usually works with the "everything is displayed" mode. There all objects bearing any variants/options information can be displayed in an alternative color (preferable dark green). Thus it is possible to easily differentiate between the default circuit parts (for which no special definition is available) and such bearing variants/options. The user is then able to edit the optional ones.
This display mode can be activated using Settings... -> Variants/Options -> Display -> Draw elements with variants/options in other color and the desired color can be selected from the drop-down list.
This mode only applies to elements (connect lines, symbols, graphics, texts etc.) which are not displayed grayed out. This mode also overwrites the color which would be displayed with the option View -> Connection Types (¶) activated for a connection line.
If connections are assigned an option which is displayed grayed out, the wires are not routed and that is why the wire's properties are not displayed.
Note
All elements for which a variant or option definition is possible are displayed in the color set, if such a definition is available, i.e. the color set is used for:
-
all symbols of devices that belong to at least one option;
-
all connection lines, all free texts and all graphic objects which belong to an option or to a certain variant;
-
all symbols of variant devices (own instance);
-
all symbols of the default variant's device, if this device contains an instance in a variant.
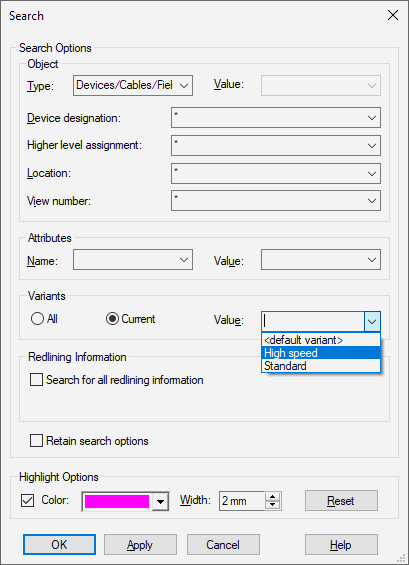
Searching for Variants
Different options are available in the Edit -> Search dialog for the search for variants:
-
All
The specified objects of all variants are displayed
-
Current
The specified objects of the currently active variant are highlighted
-
Value
The specified objects of the selected variant are highlighted
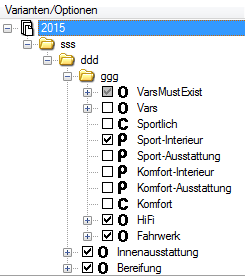
Structured Display of Objects in Variants/Options Tree
The Variants/Options Tree can be displayed as a structured folder. This folder represents the values of the sorting attributes, which are created automatically after being defined. If one of the following objects...
-
variants
-
options
-
packages
-
configurations
-
harness families
has this sorting attribute, it is automatically sorted in the corresponding folder.
So that the attributes can be displayed in the Variants/Options Tree, the owner Variants/Options must be defined on the respective attribute in Database Editor Mode under Format -> Attribute Names....
Note
For existing projects the configuration must be updated afterwards in the project.
Now the required attributes must be defined for the objects (variants, options, packages, configurations and harness families).
-
Right-click on the desired object in the Variants/Options Tree and select the context menu command Properties...,
-
next select the Attribute Values tab in the 'Properties'
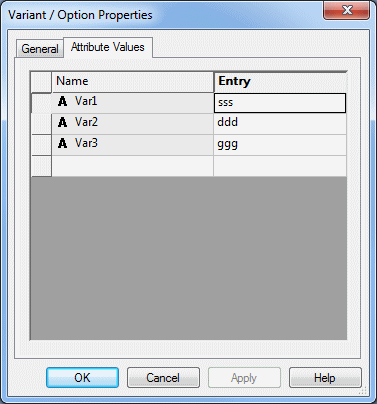
The next step is to define which attributes shall be used as sorting criteria in the Variants/Options Tree.
-
Right-click in the Variants/Options Tree in the Project Window and select the context menu command Tree Control Properties...,
-
select the Sorting tab in the 'Tree Control Properties'
Using Keys 1-5 a sorting attribute can be defined in the respective drop-down list for the Variants/Options Tree:

Variants/Options Tree without Structuring

Variants/Options Tree with Structuring
Note
-
When exporting/importing the structure, the attributes on the objects are transferred as well.
-
When moving objects to another folder, they receive the attributes necessary for the structuring.
-
When moving objects in a folder, they are sorted after the last object in the folder.
-
Folders can be renamed. In doing so, the attribute values of all underlying objects are correspondingly adapted.
-
The folder has a context menu command for creating objects. These receive the required attributes for the structuring and are sorted after the last object in the folder.
-
If the structure is locked,
-
the folders are displayed as greyed-out in the tree
-
the objects can no longer be moved to another folder
-
the folders can no longer be renamed
-
the attribute values in the Properties can no longer be changed on the objects.
-
Imported Options Automatically Activated when Importing Subcircuits
When importing subcircuits (see also Import Drawing) the system proceeds as follows:
-
When the option already exists in project and:
-
the options are merged, the visibility corresponds to the one defined in the project;
-
the imported option is renamed, the visibility corresponds to the one defined when the option is exported.
-
-
If the option does not yet exist in the project, the visibility corresponds to the one defined when the option is exported.
Exporting Sheets with Inactive Variants/Options when Exporting Sub-circuits
When executing the following actions, sheets that are hidden through variants/options, i.e. sheets of inactive variants/options, are also exported/copied:
-
When exporting a complete project or folder in the Sheet tree view into a subcircuit.
-
When copying a folder in the Sheet tree view.
With all other export interfaces (e.g. PDF, SVG, CGM etc.) only the displayed sheets are exported (i.e. WYSIWYG).
Assigning Options to Symbols (e.g. Sheet Reference Symbols)
It is possible to assign symbols to an option. To do so, the context menu's Options... command can be selected in the Device tree view for connectors and component symbols. This command defines options for these elements and therefore their visibility or availability (similar to the levels).
When an option is inactive, this is displayed by a gray symbol icon (switched off) in the Device tree view. The visibility in the drawing corresponds to the modes defined in the Settings... (invisible, gray, other color).
Furthermore, the variant section is also available in the Symbol Properties.... Options can be assigned there to component symbols, connectors, shield symbols and sheet references.
Remarks on signal references
In the normal multi-user mode, the references are always calculated as if all options were activated. In single-user and multi-user exclusive mode, the references are calculated in connection with the options.
Remarks on pin view symbols
Options for pin view symbols cannot be defined independent of the original symbol. The display of pin view symbols always depends on the definition of the original symbol.
Displaying Individual Terminals in Options
It is possible to individually display terminals in options. The handling is the same as with cables. The individual wires can also be assigned options, or switched on or off.
Remarks on the terminal plan
In the normal multi-user mode the terminal plan is always calculated as if all options were activated, i.e. blank lines can be generated. In single-user or multi-user exclusivemode the terminal plans are calculated in connection with the options.
(see also Terminal Plan)
Possibility to Deactivate Inheritance of Variants/Options to Devices or Symbols When Placing
When moving or placing symbols and devices, it is possible to control how the options assigned to the sheet shall be used for the symbol/device.
To define the option inheritance, the dialog Option Inheritance is available under Settings -> Variants/Options.
Saving and Loading Variant/Option Configuration in External File
Elements/options in the Variants/Options tree can be saved as an *.xml file regarding their visibility (which variants/options, package, configurations, harness families and harness derivatives are active or inactive) or structure (which variants/options, package, configurations, harnexx families and harness derivates are existing).
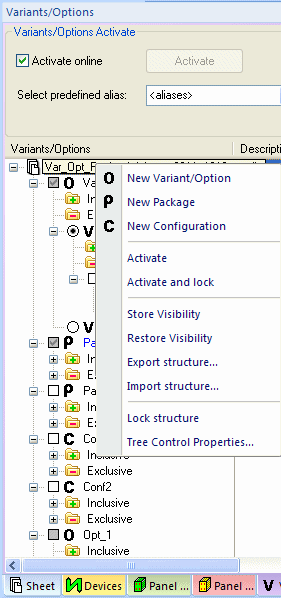
This enables simple copying&pasting of default definitions between projects. The following commands are thus available (to be selected from the context menu displayed when right-clicking on root element within the tree view):
-
Store Visibility stores the checkboxes' status (checked / unchecked) in the Variants/Options tree;
-
Export structure saves the visibility and the individual elements' existence, i.e. the structure within the Variants/Options tree;
Note:
The first selected language is used for translatable texts
The complex configuration of a project, for example for releasing a machine to a customer, can be loaded into the project using the *.xml file as well as the *.voc file (variant option configuration). This enables restoring a previously saved project status for continuing work.
The following two commands are available in this context:
-
Restore Visibility loads the checkboxes' status (checked / unchecked) in the Variants/Options tree;
The visibility of all variants/options, packages, configurations, harness families and harness derivatives existing in the project is set according to the information from the file assigned through the name.
-
Import structure compares the elements in the Variants/Options tree and creates those that are not yet existing. In addition, the visibility of all variants/options, packages , configurations, harness families and harness derivatives in project is set according to the information from the file assigned through the name.
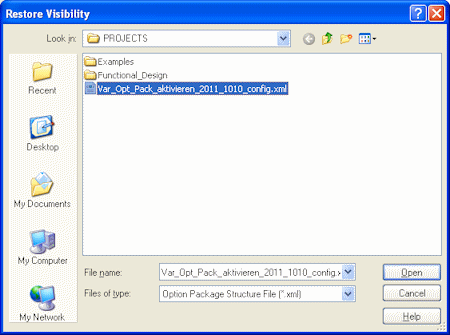
To load the variant/option configuration for the project,
-
select the Restore Visibility or Import structure command from the Variants/Options tree view and
-
specify the desired *.xml file in the displayed dialog:
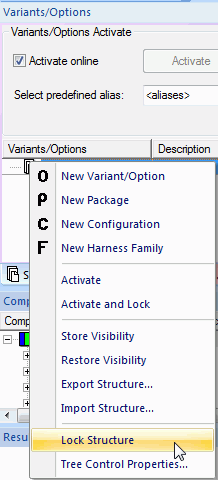
Locking Variant/Option Structure Against Modification
When several users are working on a project, it may be useful to lock the structure of variants/options, packages or configurations to prevent modifications from being carried out using the command Lock structure.
Only the check box settings controlling the visibility can be changed in the tree. All elements contained therein are locked from being modified. For unlocking the structure there is the command Unlock structure.
To lock the structure
-
right-click on the project name or on an element in the Variants/Options tree,
-
select the Lock structure command from the displayed context menu.
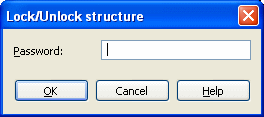
If a password has been defined, it must be entered to lock/unlock the structure:
Remarks
-
The project name and all elements in the variants/options tree are grayed-out after locking.
-
All elements are displayed by a locked symbol.
-
The visibility of the variants/options, packages or configurations can still be edited.
-
If the variant/option structure is locked, the Import structure... command can no longer be executed.

To unlock the structure
-
right-click on the project name or on an element in the Variants/Options tree,
-
select the Unlock structure command from the displayed context menu.
If a password has been defined, it must be entered to lock/unlock the structure:
Moving Devices in the Panel onto Variant Positions
When a variant is defined, it's possible to move devices on a panel sheet to any position using the Move device to variant position command. The command is similar to the Move command, however, when dropping the modification becomes effective as variant position in the active variant only.
When deactivating the variant, the device is displayed in the original position.
The model, corresponding to normal moving, can be placed on other mounting rails, in the open and on other sheets. See example.
Before
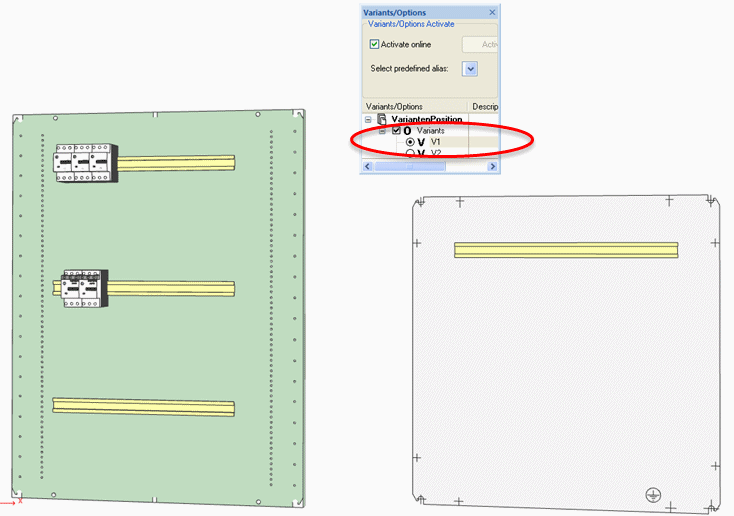
After

When the project contains several active variants in various variant groups, the following dialog box appears upon execution of the Move device to variant position command. The Choose a variant dialog is used to select the desired variant:
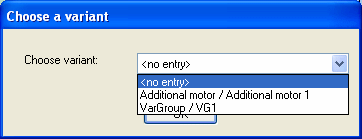
Select <no entry> to NOT move the selected device to a variant position, that means the command is analog to the Move command.
When a device is moved in a certain variant in the panel, certain restrictions are valid regarding subsequent actions. If the user still wants to execute those actions, the position change in the variant must first be undone.
This can be done using the context menu's Move device to default position command on panel sheets, if the device on which the context menu is called has a variant position in the current variant.
What is more, the device must not be placed on another device with a variant position.
Delete Variant Positions
It's possible to delete only the variant position of the device without the related default devices.
For a variant position to be deleted, it has to be unplaced. With the existing context menu command Unplace variant positions placed on a panel sheet can now be unplaced. Afterward, the unplaced variant position can be deleted from the project.
To do so, there is the new context menu command Delete Variant Position in the Device Tree.
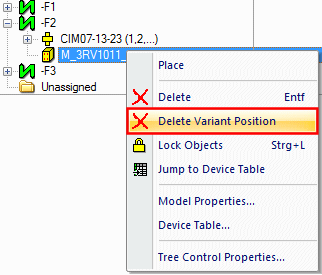
Note
If the command Delete Forced is executed, the standard device together with all affiliated variant positions is deleted.
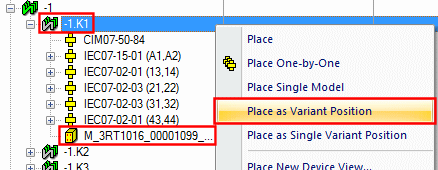
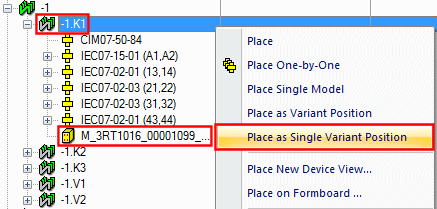
Place Variant Position / Place Single Variant Positions
It is possible to place devices as variant position. There are two new context menu commands in the Device Tree:
-
Place as Variant Position used for devices or assemblies / assembly element
-
Place as Single Variant Position used for assembly elements
Note
-
A panel sheet must be opened!
-
There is no variant position for the currently active variant.
-
The check box for Variants: must be set to default (called up in the Settings under Variants / Options -> Display in the section Activation of Variants / Options).
-
The standard device must not be forcibly placed.
-
It can be devices or assemblies / assembly elements, which can be placed on a panel sheet.
Place as Variant Position
If the context menu command Place as Variant Position is called up using a device, the device is placed at the variant position of the currently active variant.
If the context menu command Place as Variant Position is called up using an assembly element, a variant position is created for every assembly element of the currently active variant.
In doing so, the assembly elements are placed as plugged with the appropriate slot and mounting rail descriptions. Assembly elements, which are not plugged together" can be inserted as 'unplaced' variant positions in the Device Tree.
To execute the command Place as Variant Position:
-
right-click in the Device Tree on the...
-
device symbol or model of assembly element
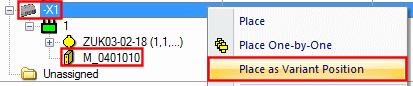
-
assembly element symbol or on model of assembly element
-
-
select the context menu command Place as Variant Position
Place as Single Variant Instance
To execute the command Place as Single Variant Position:
-
right-click on the assembly element symbol or model of assembly element in the Device Tree
-
select the context menu command Place as Single Variant Position
Plugging several pins to already placed pin
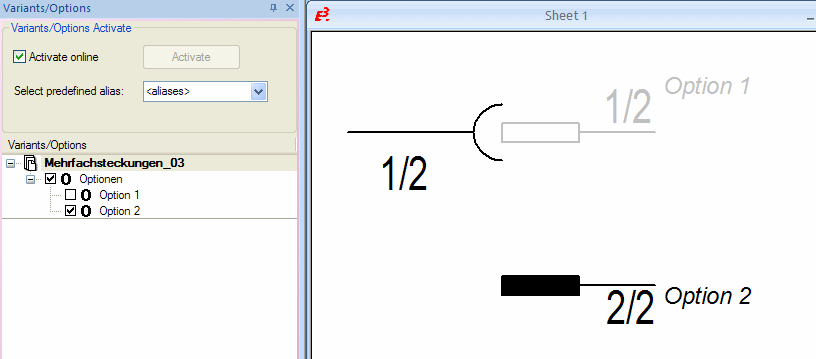
It's possible to plug several pins that have variants/options assigned onto an already placed pin.
The following example explains this functionality (inactive options are grayed out):
-
The mating connector supplied with Option 1 was placed on the connector.
-
Afterwards, the check box for Option 1 is deactivated and the check box for Option 2 activated under the Variants/Options tab.
-
The mating connector assigned Option 2 can now additionally be placed on the connector.

Note
When placing, no additional active mating connectors may be located on the position to be plugged.
Additionally, there is the verification method Checking active plug connections - (0048) More than one active plug connection in the default verification programs of E3.series (under Tools -> Verify). A project-wide check takes place to see whether there is more than one active plug connection for plugged connections. In doing so, the presently used setting is valid for verifying plugged connections with variants/options.
It's recommended to also use the verification method Checking object collision by current variants and options - (0037) Open nodes. This checks to see whether there are any open pins (nodes) in the project.
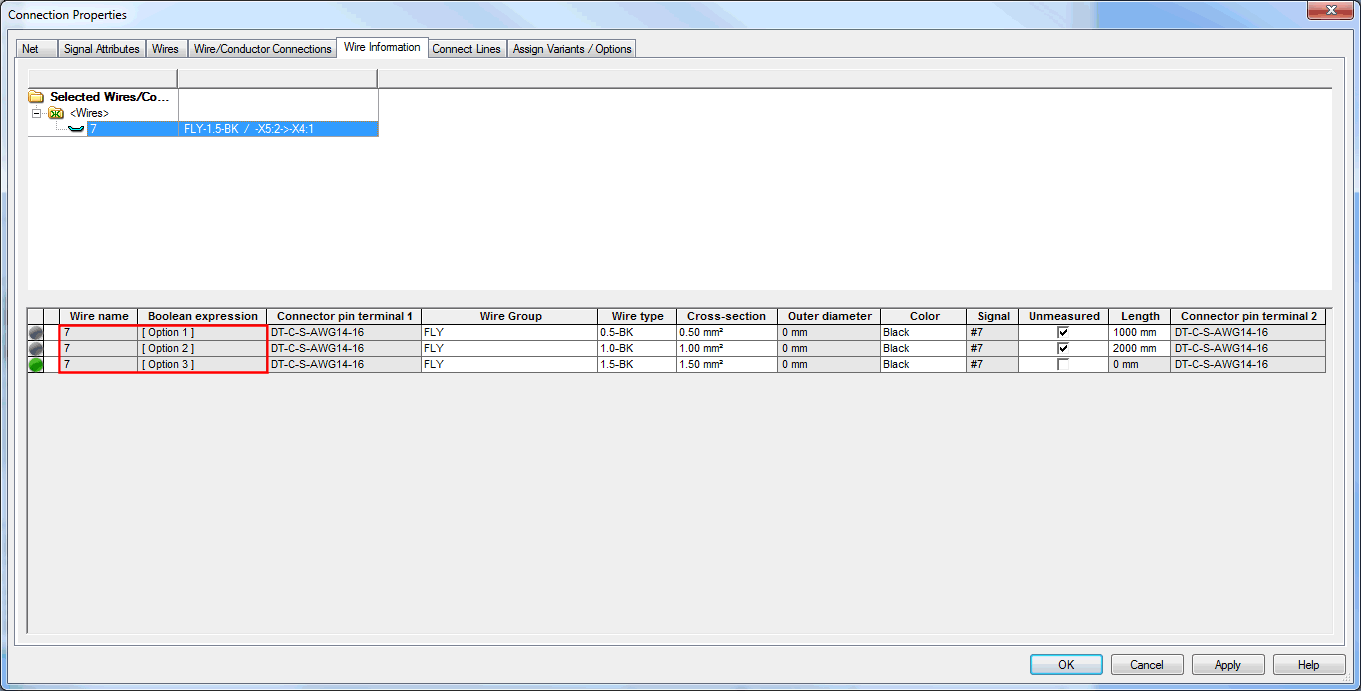
Usage of option combinations
There are various possible use cases in E3.series, so that a wire can exist in several types or versions in a project.
The option Show information for option combinations must be activated for that purpose (under Tools -> Settings -> Connection -> Cores / Wires, section Core Assignment Procedure).
Note
Using the new tab Wire Information in the Connection Properties dialog box, it's possible to define different values for the wire.
1. Possibility: Different Wire Properties through Several Options
The following example shows how to assign three different options to the wire:
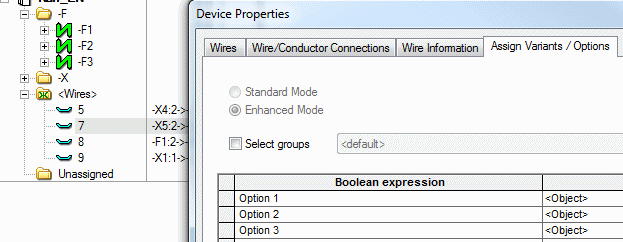
A separate type or version of the wire is automatically created for each option . The Wire Information tab now displays the wire in three versions:
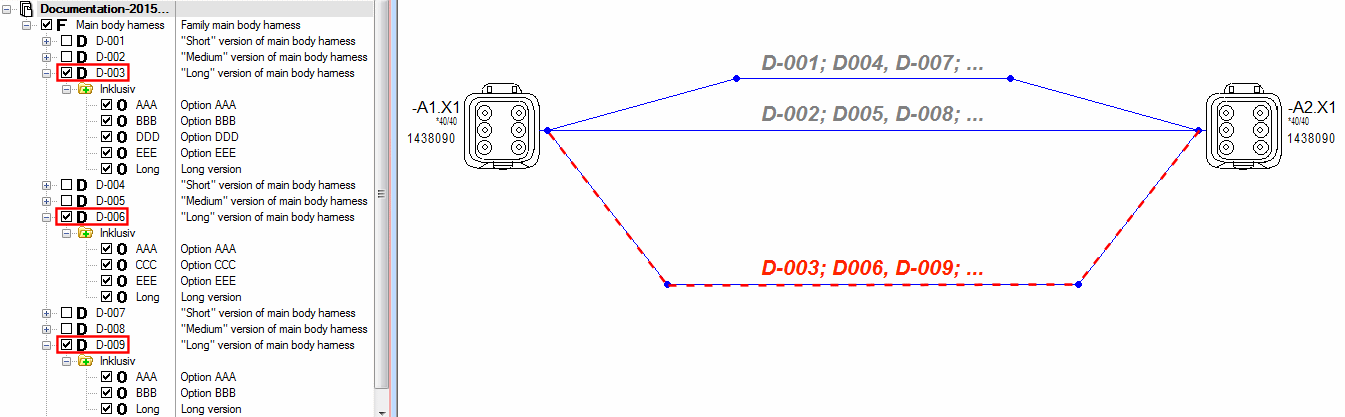
2. Possibility: Different Wire Properties Through Several Connection Paths
This functionality is only possible on a formboard sheet!
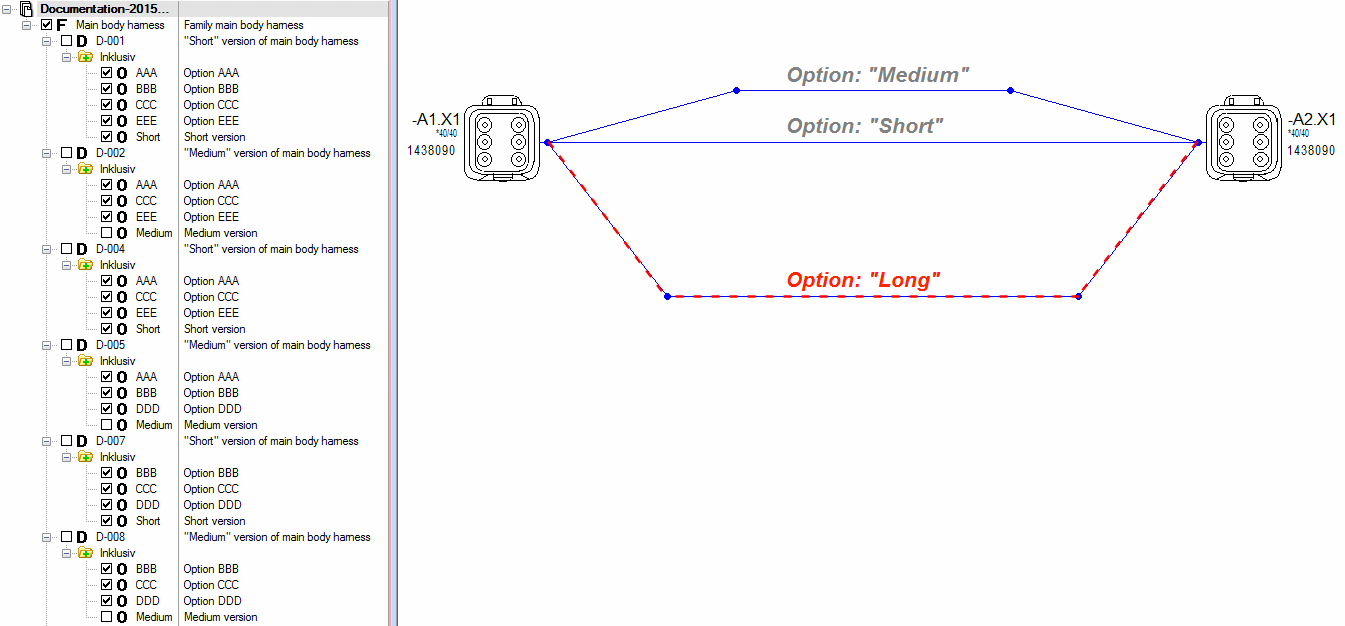
The following example shows how to route a wire in several connection paths. A version of the wire is automatically created for each possible connection path. It's possible to define a valid connection path by assigning harness derivatives to net segments (see Harness Families and Harness Derivatives in Variants/Options Mode).
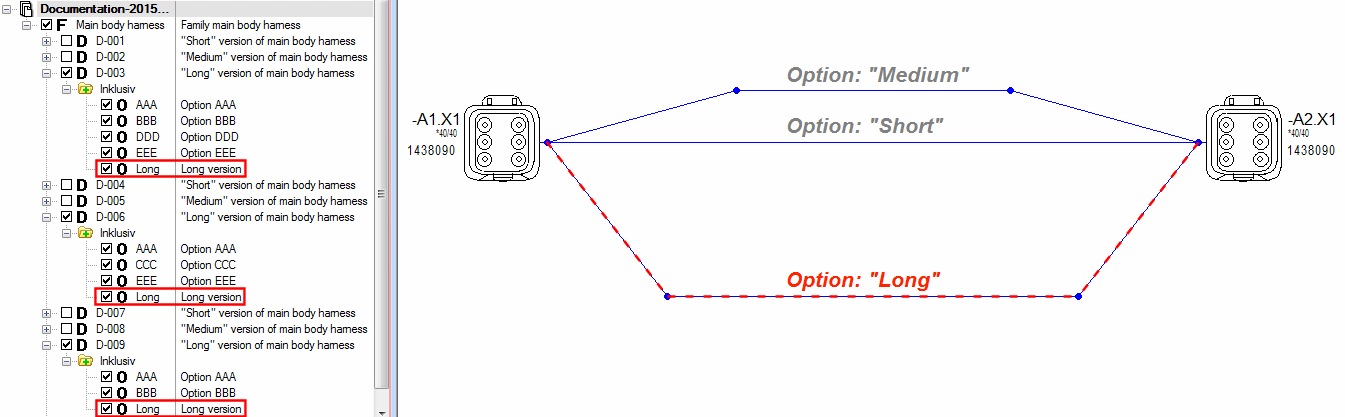
Three possible connection paths are available for this example.
Note
The option Allow net loops must be activated (under Tools -> Settings -> Connection in the section Net) in order to allow several connection paths.

When now placing a wire on a connection path, this wire is automatically also placed on the other possible connection paths:

Note
-
When the option Show information for option combinations (under Tools -> Settings -> Connection -> Cores / Wires, section Core Assignment Procedure) is deactivated, the different wire properties for multiple connection paths are deleted. The wire is then placed on the shortest connection path.
-
When several wire types or versions with different outer diameters / cross-sections exist in a net segment, the following is valid:
To calculate the segment diameter, the system uses the wire type or version with the maximum outer diameter (incl. wire color) / cross-section. In addition, the dialog Segment Diameter (right-click on the connect line and select the corresponding command from the displayed context menu) appears showing a hint that the calculated segment diameter is not unique.
Automatic Routing of Wires with Option Combinations in Formboard
In total there are three possibilities for automatically placing (routing) wires/conductors that are assigned options in formboard.
Note
To do so, the check box Show information for option combinations must be checked (in the settings under Tools -> Settings -> Connection -> Conductors/Wires in the section Conductor Assignment Procedure.
Case 1: Routing Wires using Cable Harness Derivatives
Cable harness derivatives are assigned directly to net segments. Wires with an appropriate option are automatically routed through these net segments.
Case 2: Routing Wires using Options (indirectly through cable harness derivatives)
Due to the fact that numerous cable harness derivatives are available in larger projects, routing wires directly may be extremely difficult to manage. That is why this routing method is recommended.
An option can be assigned to a formboard net segment instead of a cable harness derivative. For this option all appropriate cable harness derivatives are determined automatically.
The wires are routed as if the determined cable harness derivatives have been assigned to the segment.
Case 3: Routing Wires using Options (without cable harness derivatives)
If no appropriate cable harness derivative is found in the project, the automatic routing of wires takes place using options. For this the option combinations on the wires and net segments must be identical.