Verify
The Tools -> Verify command, on the Main Menu bar, informs you on actual and possible inconsistencies in the circuit diagram.
Verification of the current project can be started through the command Tools -> Verify. All possible inconsistencies are listed in the E3. output window. If the messages refer to a specific object, then it is usually possible to directly jump to the related object by double-clicking on it.
With the key F4, you may go to the next line in the output window, with Shift-F4 to the previous result line.
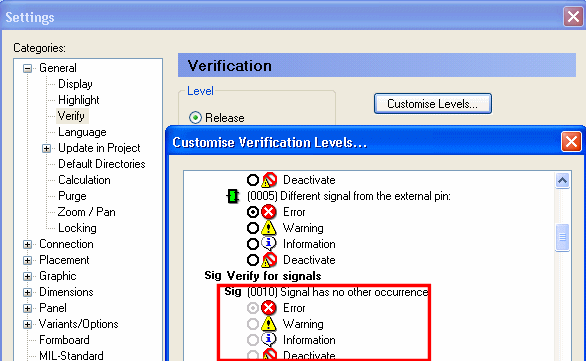
Each individual check within E3. can be switched on or off by the user. For an easier handling and to help you keep an overview of the results, you may choose between three verification levels (Release, Development, Draft).
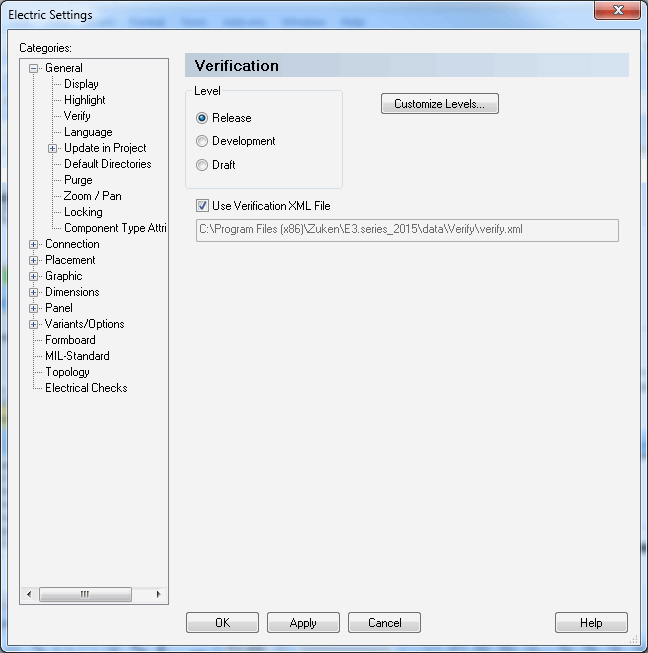
The category to be used for the verification can be chosen in this dialog box in Tools -> Settings -> General -> Verify.
To switch on or off specific checks for the desired category, simply click on Customize Levels.... Each individual check can be activated or deactivated for the currently selected category.
The Use Verification XML File option offers the possibility to use a customer-specific script or program for project verification.
The following paragraphs describe how to embed the verification XML file, its meaning and usage.
Changing the String Value for Calling Up the XML Verification File
The XML verification file is called up using the string value VerifyXMLPath for E3.series or VerifyXMLPath_Logic for E3.logic. This string is created automatically with the installation:
-
For 32-bit E³.series / on 64-bit operating system, the string value is located in:
'HKEY_LOCAL_MACHINE\SOFTWARE\Wow6432Node\Zuken\E3.series\<version>'
-
For 64 bit E³.series or 32-bit E³.series /on 32-bit operating system, the string value is located in:
'HKEY_LOCAL_MACHINE\SOFTWARE\Zuken\E3.series\<version>'
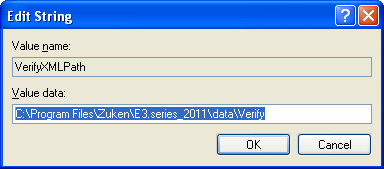
If the XML verification file should be placed in another location (e.g. storage location that a normal user cannot access), the new location must be adjusted in the Registry under Value Data. To do so,
-
right-click on the string value VerifyXMLPath or VerifyXMLPath_Logic and select Modify,
-
enter the new location under Value data.
It's possible to specify whether the verification settings can be changed by a user or not.
This is controlled using the configuration file settings.cfg with the format VERIFY_USE_XML_FILE, 0 or 1.
-
(1) : the checkbox is active for the command Use XML Verification File
-
(0) : the checkbox is not active for the command Use XML Verification File
Meaning of the XML Verification File
In the Prologue of the XML verification file the user can define whether a log file is created in ASCII format for each verification level. The messages generated in the Results Window are stored in these log files after executing a check.
The following example shows the XML elements for the root element <logFile>:
|
Row |
Programming Text |
|---|---|
|
01 |
<verify> |
|
02 |
<logFile> |
|
03 |
<releasePath toProjectFolder="0"></releasePath> |
|
04 |
<developmentPath toProjectFolder="0"></developmentPath> |
|
05 |
<draftPath toProjectFolder="0"></draftPath> |
|
06 |
</logFile> |
|
07 |
<!-- |
In rows 03-05 the respective location of the log file is specified for each verification level. These are:
-
Release (releasePath)
-
Development (developmentPath)
-
Draft (draftPath)
The setting possibilities are valid for all three levels (displayed as ###):
-
<###Path toProjectFolder="0"></###Path>
For "0" and without specified storgae location is No log file is created. -
<###Path toProjectFolder="0">STORAGE LOCATION</###Path>
For "0" and a defined location is Log file created in this location. -
<###Path toProjectFolder="1"></###Path>
For "1" and without specified location is Log file generated in the path of the E3 project.(For multi-user projects this is saved in the Windows Temp Directory.)
The root element of the XML verification file is constructed as follows:
|
Row |
Programming Text |
|---|---|
|
01 |
<group> |
|
02 |
<name>My verification group</name> |
|
03 |
<icon>myGroupIcon.bmp</icon> |
|
04 |
<check> |
|
05 |
<id>-1</id> |
|
06 |
<name>Verfication Name</name> |
|
07 |
<icon>myVerifyIcon.bmp</icon> |
|
08 |
<cmd>"C:\Program Files(x86)\Zuken\E3.series\data\myTestScript.vbs" Arg1 Arg2</cmd> |
|
09 |
<release changeable="1">3</release> |
|
10 |
<development changeable="1">2</development> |
|
11 |
<draft changeable="1">1</draft> |
|
12 |
</check> |
|
13 |
</group> |
|
Row |
Meaning of the XML Elements |
|---|---|
|
01 |
<group><group> Defines a group of checks |
|
02 |
<name></name> Name of the group; texts from the language database can also be used. Texts from the language database must be assigned in the format &#[ID];. The '&' character must be replaced by '&'. |
|
03 |
<icon></icon> Symbol of the group. |
|
04 |
<check> </check> Defines a check. |
|
05 |
<id></id> Number for each check:
|
|
06 |
<name></name> Name of the check; texts from the language database can also be used. Texts from the language database must be assigned in the format &#[ID];. The character '&' must be replaced by '&'. |
|
07 |
<icon></icon> Symbol of the check. |
|
08 |
<cmd></cmd>
|
|
09-11 |
<release changeable="1">3</release> <development changeable="1">2</development>
Defines the importance of the verification level:
|
|
|
changeable="1" bzw. "0" Defines whether the user can change the verification level
|
Defining Check as 'Not Changeable'
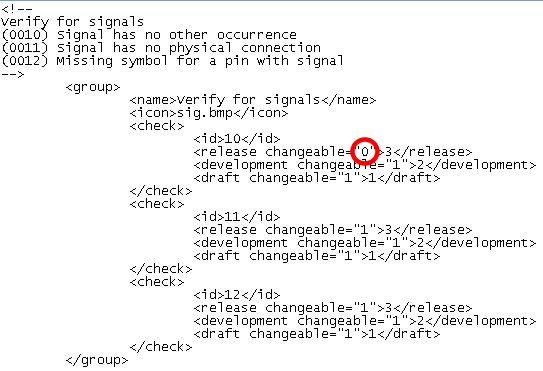
In the following example the check 'Signal has no other occurrence' is predefined with the value Error (3) for the level Release and can no longer be changed by the user.
To do so, change the value from '1' to '0' for the level Release (release changeable) in the XML verification file in the area 'Checking signal occurence - (0010) Signal has no other occurrence (see below):
In the Customize Verification Levels... dialog (called up using Settings -> General -> Verify -> pushbutton Customize Levels...) the verification levels can no longer be changed by the user. The predefined verification level is executed.