Device Properties / Connection Properties - Wire Information
Note: The dialog can only be displayed if a
-
right-click on a connection line and select Connection Properties from the displayed context menu. To select more than one connection line for modification, hold down the shift key, then left click on each of the desired lines and right click on the final line to display the context menu.
-
Or left click on a connection line to highlight it (or for multiple lines, left click on each line while holding down the 'shift' key) and select Format -> Connection Properties on the Main Menu bar..
To display/modify the wire information of a connection line,
-
Or right-click in the device tree of the Project window on the desired wire and select the command Wire Properties from the displayed context menu. To select more than one wire for modification, hold down the shift key, then left click on each of the desired wires and right click on the final wire to display the context menu.
Switch to the Wire information tab in the displayed dialog box:
|
Device Properties / Connection Properties - Wire Information |
|
|---|---|
|
|
Each wire shows a status symbol in the first column.
Notewire instance is created automatically
|
|
|
If several wire instances can be connected to a pin, an additional drop-down menu appears in the second column.
Click on the button
These columns cannot be changed and are merely for informational purposes.
Click on the button |
|
Wire name |
Displays all placed wires of the selected connection. |
|
Boolean expression |
Displays, if existing, the defined Boolean expression (harness derivative, option) on the wire.
NoteOptions are displayed in square brackets. Example: [Option 1]. |
|
Connector pin terminal1 |
Displays the current connector pin terminal for each wire in the selected connection path.
See under: Use of Cavity Parts in Project |
|
Wire seal 1 |
Displays the current wire seal for each wire within the selected connect path.
See under: Use of Cavity Parts in Project |
|
Wire group |
The desired wire group for the wire can be defined from this selection list.
Note
|
|
Wire type |
The desired wire type can be defined for the wire from the selection list. |
|
Cross-section |
The desired cross-section can be defined for the wire from the selection list. |
|
Outer diameter |
Displays the corresponding wire's outer diameter, if a value is defined in database.
NoteRegarding conductors of dynamic cables, the outer diameter can be defined in the cell. |
|
Color |
The desired color can be defined for the wire from the selection list. |
|
Signal |
Displays the signal name of the corresponding wire. |
|
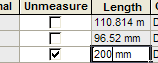
Unmeasured |
When this checkbox is checked, a length can be specified.
When this checkbox is not checked, the conductor/wire length is automatically calculated by the system.
NoteThis functionality only exists in the modules E3.panel, E3.formboard and E3.topology |
|
Length |
When the checkbox Unmeasured is checked, the system uses the conductor / wire length defined in this field:
|
|
Connector pin terminal 2 |
Displays the current connector pin terminal for each wire in the selected connection path.
See under: Use of Cavity Parts in Project |
|
Wire seal 2 |
Displays the current wire seal for each wire within the selected connect path.
See under: Use of Cavity Parts in Project |
 Active
 Inactive
 to display a drop-down menu with the following information:
 to hide the drop-down menu.