
Checking the Circuit with E3.eCheck
Activating / Deactivating Electrical Checks
After having prepared the circuit to be checked in Project mode, the electrical checks can be started.
To activate the electrical checks
-
check the option Activate electrical checks in the Electrical Checks Settings, or
-
use the button Electrical Checks
 in the corresponding toolbar Electrical Checks.
Note
Regarding electrical checks of connections, routed connections are always superior to logic connections.
To deactivate the electrical checks
-
uncheck the option Activate electrical checks in the Electrical Checks Settings, or
-
deactivate the button Electrical Checks
in the corresponding toolbar Electrical Checks.
Changing State
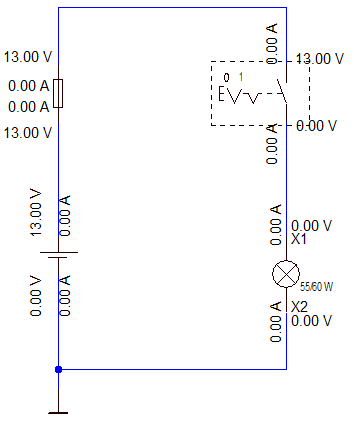
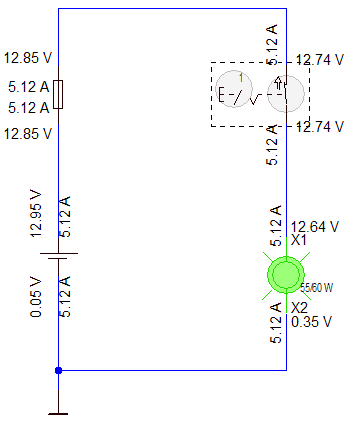
E3.check calculates the circuit starting from the voltage source's positive pole. If the circuit is not finished yet or a net interrupted, the check stops. Only if the current circuit is closed, the check comprises all components.
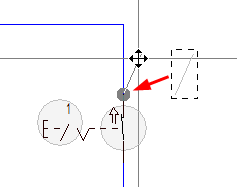
To do so, a switch or coil must be closed/opened, which can be done by changing the state of the corresponding symbol.
![]()
To change the symbol state
-
select the desired symbol and
-
use the corresponding toolbar button from the toolbar Electrical Checks
-
or right-click on the desired symbol and
-
select the Change State command from the displayed context menu,
-
and in the submenu appearing
-
the command
 Next to select the next defined state or
 -
the command
 Previous to select the previous state or
 -
to directly select the desired state
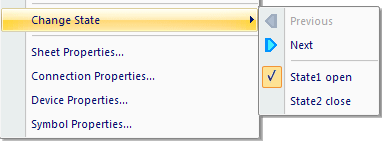
Note:
The currently selected state is visulized by a checkmark.
-
Changing Attribute Values / Limit Values on Symbols
It's possible to change attribute values and limit values of symbols afterwards. To do so
-
right-click on the desired symbol and select the command Symbol Properties... from the displayed context menu,
-
switch to the Functional Units tab and
-
click in the desired attribute's cell in the Entry column to enter a new value:
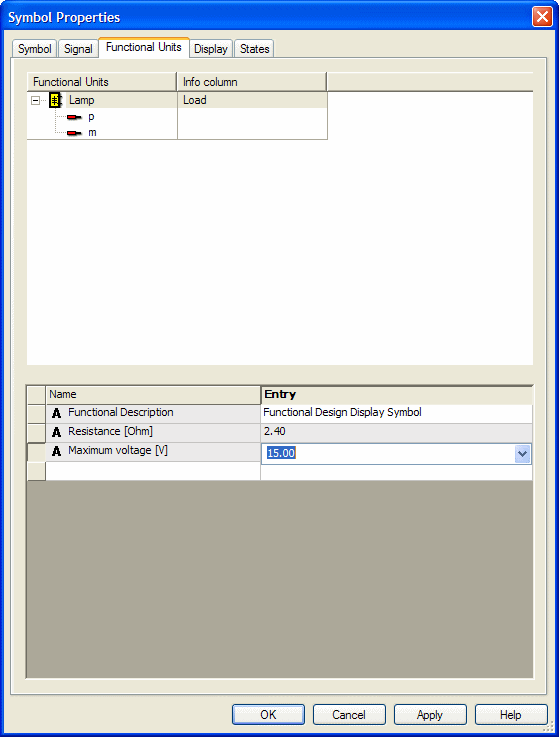
Note:
Components with fix properties assigned cannot be changed.
Displaying Check Results
E3.check calculates the actual voltage and current flow of each pin contained in the circuit.
The results can be displayed in various ways:
-
Display Results in Tooltips
-
Display results in Symbol Properties
-
Display results with attribute text template symbols
-
Display results with current and voltage indicators
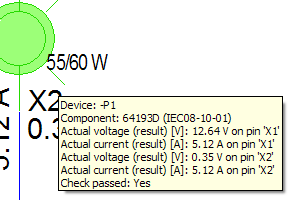
Display Results in Tooltips
Move the mouse over the desired symbol to see a tooltip containing the following information:
-
Device
-
Component
-
actual voltage on pins
-
Actual current on pins
-
Check passed: Yes / No
Tooltip when electrical checks are activated
Current results of the electrical checks are displayed.
Tooltip when electrical checks are deactivated
Results of the previous electrical checks are displayed.
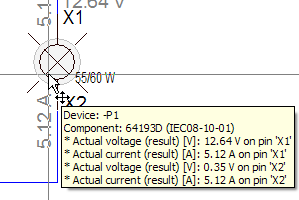
Note
Those results are marked by an asterisk *
Display results in Symbol Properties
The measured values are also shown in the symbol's Symbol Properties - Symbol dialog:
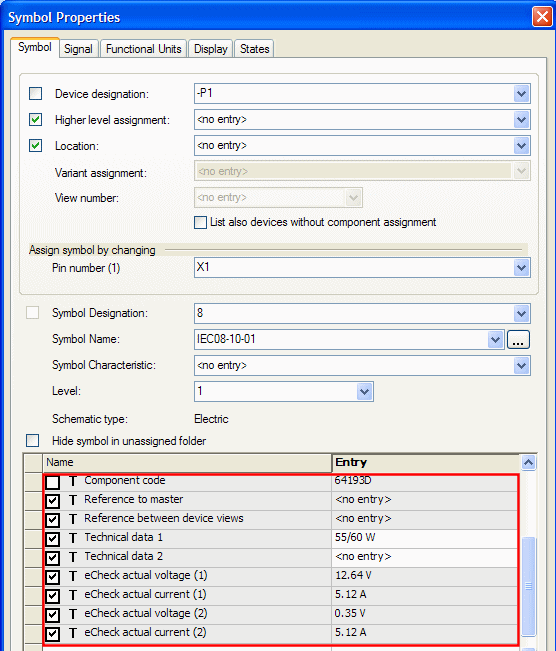
Note
The eCheck text types must be defined for the symbol.
Display results with attribute text template symbols
The attribute text template symbol eCheck_actual_U_I (available in Misc tree of Project window) can be placed on the desired pin in the circuit.
The corresponding voltage and floating current on the pin are displayed:

Note
The attribute text template symbol must exactly be placed on the pin:
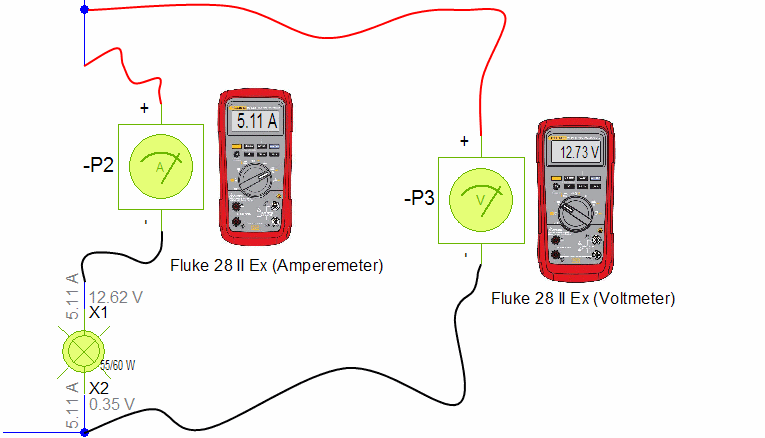
Display results with current and voltage indicators
Measurement results can also be displayed using the current and voltage indicators provided in the default database (in the Project window’s Component tree).
Therefore, the corresponding indicator must be placed in the circuit.
Note
These measuring devices are only for demonstration purposes as the appropriate circuit is influenced by the values of the functional attributes on the measuring devices.
-
Component for current indicator: Fluke 28 II Ex (Amperemeter)
-
Component for voltage indicator: Fluke 28 II Ex (Voltmeter)
Displaying Current Flow
It's also possible to display the current flow direction in the circuit.
Therefore an arrow appears on the connect line. To have the current flow direction displayed, the option Display current flow must be activated in the Settings -> Electrical Checks.
When now left-clicking on the connect line, the arrow representing the current flow direction appears:
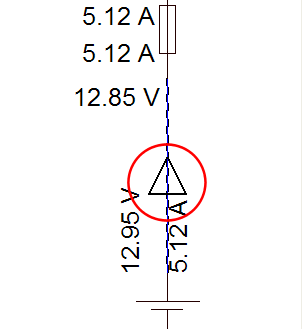
Note
The current flow direction runs from higher to lower voltage
Adding Specific eCheck Attributes to Connection
It’s possible to add eCheck-specific attributes to net segments. The following eCheck attributes are predefined in the database:
-
.ECHECK_AMBIENT_TEMPERATURE (Ambient temperature [°C])
-
.ECHECK_SPECIFIC_RESISTANCE (Specific resistance [Ohm x mm²/m])
-
.ECHECK_CROSSEC (Wire cross-section)
-
.ECHECK_COLOUR (Wire colour)
-
.ECHECK_WEIGHT (Wire weight [kg/km])
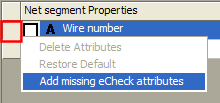
Adding eCheck Attributes to Existing Net Segments
When the Add attributes to new net segments and update physical length of used core/wire option is checked (under Tools -> Settings -> Electrical Checks -> General), all eCheck attributes are automatically added to net segments newly created.
Note
This possibility is valid for all existing projects that already contain net segments
Adding eCheck Attributes to Existing Net Segments
It’s possible to add missing eCheck attributes to existing net segments afterwards. To do so, (at least) one net segment must be selected that doesn’t yet contain a conductor or wire. Otherwise the context menu command Add missing eCheck attributes is displayed grayed out (inactive).
Note
This possibility is valid for all existing projects that already contain net segments
To add missing eCheck attributes to an existing net segment
-
Right-click on an existing net segment and select the command Connection Properties… from the displayed context menu,
-
then right-click on the first column of an already defined attribute and
-
select the command Add missing eCheck attributes from the displayed context menu.
Note
When placing a wire on a net segment, the attributes of the wire (if existing) are used. All properties not defined for the wire are added to those defined for the net segment. The attributes defined for the net segment are deleted.
Calculating Wire Resistance
-
Wire resistance
-
Net segment resistance
Calculation of the wire resistance
The wire resistance is calculated using the following formula:
[R] = wire resistance
[ρ] = specific resistance
[l] = wire length
[A] = cross-section area
[α] = resistivity temperature (coefficient)
[∆T] = ambient temperature- temperature 20°C
Specific resistance and resistivity temperature (coefficient)
The specific resistance can be defined under Format -> Wire Materials in Database Editor mode.
-
Switch to the Material tab to define the following values for the wire material:
-
Resistivity temperature [1/C] (coefficient)
Note:
If the attribute Wire Kind is not assigned to the wire / conductor, copper is used as wire material (0.00393 1/C).
-
Specific resistance [Ohm x mm²/m]
Note:
If the attribute Wire Kind is not assigned to the wire / conductor, the specific resistance can also be defined through the attribute .ECHECK_SPECIFIC_RESISTANCE (Specific resistance [Ohm x mm²/m]).
-
-
Then define the wire kind (consisting of wire material and insulation material) in the Wire Kind tab.
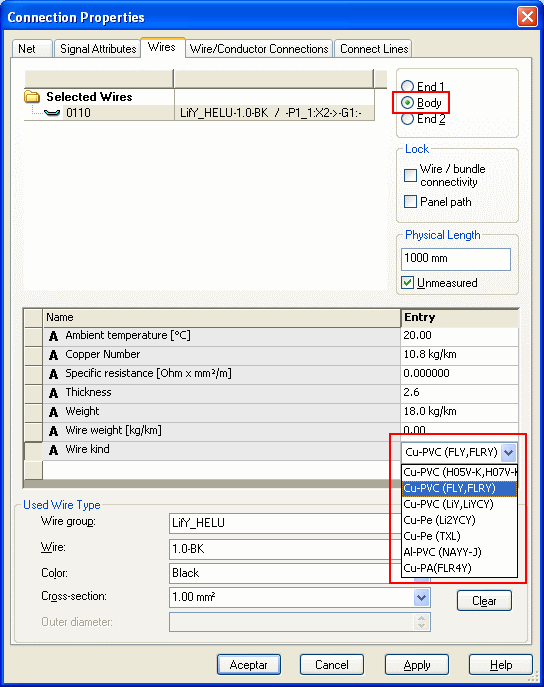
In Database Editor mode, or later in Project mode, select the desired wires in Wire Properties - Wires or Connection Properties - Wires and select the option Body.
Assign the attribute Wire Kind to the wire and select the desired material from the drop-down list:
Wire length
The wire length corresponds to the physical length of the wire / conductor and can be defined in Wire Properties - Wires or Connection Properties - Wires.
Cross-section area
The cross-section area corresponds to the cross-section of a wire / conductor (predefined wires from database).
Ambient temperature
Select the desired wires in Wire Properties - Wires or Connection Properties - Wires and select the option Body. Assign the attribute Ambient temperature [°C] to the wire and define the desired ambient temperature for the wire in the selection list.
If an ambient temperature is not defined, a value of 20 °C is used as ambient temperature.
Calculation of the net segment resistance
The net segment resistance is calculated using the following formula:

[R] = Net segment resistance
[ρ] = Specific resistance
[l] = Wire length
[A] = Cross-section area
Specific resistance
The specific resistance is determined through the attribute .ECHECK_SPECIFIC_RESISTANCE (Specific resistance) from the net segment properties.
Note
A default value can be defined for the specific resistance under Settings - Electrical Checks in the section Default values. The default values are automatically transferred to the connection segment upon drawing a connect line. The option Add missing attributes to new net segments (under Tools-> Settings -> Electrical Checks -> General) must be checked.
Wire length
The wire length is determined through the Net segment length of the net segment (and can be defined in Connection Properties - Net).
Note
A default value can be defined for the wire length under Settings - Electrical Checks in the section Default values.
Cross-section area
The cross-section area is determined through the attribute .ECHECK_CROSSEC (Wire cross-section) from the net segment properties.
Note
A default value can be defined for the wire cross-section under Settings - Electrical Checks in the section Default values.
Ambient temperature
The ambient temperature is determined through the attribute .ECHECK_AMBIENT_TEMPERATURE (Ambient temperature [°C]) from the net segment properties.
Note
A default value can be defined for the ambient temperature under Settings - Electrical Checks in the section Default values.
Analyzing Errors
When limit values defined as attributes, such as maximum voltage, are exceeded or fallen below on pins, this is reported as error by E3.check.
Errors in the circuit are output in different ways.
1. Graphic error display
To graphically display an error, activate the following options in Settings - Electrical Checks:
-
Fuse blown color The blown fuse is displayed colored on the symbol.
-
All other error color Other errors are displayed colored on the symbol.
Example: blown fuse
Example: other error

2. Acoustic error report
Errors in the circuit to be simulated can also be output by an acoustic signal. Therefore, the option Acoustic signal on error in the Settings - Electrical Checks.
Note
However, the error location is not stated. This can be found in the Results window.
3. Error / Status messages in Results window
Error / Status message can additionally be found in the Output window under Results:

Note
Double-clicking on a message jumps to the corresponding error location in the circuit.
The following error / status messages may appear:
-
Fuse blown
-
Maximum voltage exceeded limit value
-
Minimum voltage fallen below limit value
-
Maximum current exceeded limit value
-
Minimum current fallen below limit value
-
Fuse derating factor reached
-
Net without ground
Activating / Deactivating the Checks for Fuse melting time and wire ignition time
The check for fuse melting time and wire ignition time checks all
It checks the time when the fuse would blow, the wires between the fuses blow, and whether the time is before or after the fuse blows.
For the calculation it is determined how long the wire can be operated with the rated current of the fuses in the circuit.
The calculation is performed using the following formulas:
Method for calculating wire ignition time
I²r = (Tf-T2)/R(1-e-at)
Thus,
t = -1/a*loge{1-(Tf-T2)/RI2r}
-
t: Ignition time [sec]
-
I: Wire flowing current [A]
-
r: Resistance per length at wire
-
Tf: Wire ignition temperature [degreesC]
-
T2: Ambient temperature [degreesC]
-
R: Thermal resistance [degreesC*mm/W]
-
a: Inverse number of thermal time constant
Resistance r per length at wire ignition temperature is:
r = rnom{1+tc(Tf-Tnom)}
-
rnom : Resistance value per length at nominal wire temperature [ohm/mm]
-
tc: Temperature coefficient of resistance [/degreesC]
-
Tnom: Nominal temperature [degreesC]
Thermal resistance R is:
R = R1+R2
R1 = (P1/2ϖ)loge(d2/d1)
R2 = 10P2/ϖd2
-
R1: Thermal resistance of wire insulator [degrees C*mm/W]
-
R2: Wire surface dissipation of thermal resistance [degreesC*mm/W]
-
P1: Thermal resistance of insulator material [degreesC*mm/W]
-
d1: Inner wire diameter (outer
-
d2: Outer wire diameter (outer insulator diameter) [mm]
-
P2: Specific wire surface dissipation thermal resistance [degreesC*mm2/W]
For d2 equal to 12.5mm, P2 = 3000+320d2
For d2 greater than 12.5mm, P2 = 7000
Inverse number a of thermal time constant:
a = 1/R(H1W1+H2W2)
-
W1:
-
H1:
-
W2: Insulator weight [g/mm] (calculated from inside and outside wire diameter and
-
H2 : Insulator thermal capacity [J/degreesC*g]
Note
The following prerequisites must be fulfilled to perform the check for fuse melting time and wire ignition time:
-
The setting Check fuse melting time and wire ignition time must be activated.
-
The values for the fuse operating time of the functional unit must be available in the database and, if required, changed in the component definition.
If the attribute .ECHECK_FUSE_RERATING_TEMPERATURE is defined for the placed symbol, the values for the fuse temperature rerating must also be created in the database and, if necessary, changed in the component definition. -
The attribute Wire kind must be assigned to all wires used in the circuit diagram in the Component Properties under Body.
The different properties of the wire materials can be defined in Database Editor under Format → Wire Materials... in the respective tabs.
-
The attribute Rating (max. current fuse) must be defined for all fuses in the circuit diagram.
If the fuse blows after the cable blows, the following information is displayed in the output window under Results:
-
The Fuse operating time with the device designation, symbol designation of the fuse and the sheet and position where the fuse is placed.
-
The wire ignition time: This indicates after how many seconds the wire will blow at the given amperage and how long it would take the fuse to blow.
-
If values were used for the Fuse temperature rerating, it also shows which temperatures and rerating factors were used.
The following components / functional units are displayed with error messages in the Output window's Results view:
-
-
-
-
-
-
Fuses missing the attribute Rating (max. current fuse).
-
Fuses missing values for the Fuse operating time.
Aborting Electrical Checks
A calculation of a circuit containing a large number of loads and net segments may take a quite long time. It is thus possible to abort the check.
Note
When aborting the electrical checks, no results are stored.
To abort the electrical checks:
-
use the button Electrical Checks
in the toolbar Electrical Checks, or -
press the ESC key.