
Connection Properties - Wires
To display/modify the wire properties,
-
right-click on the desired connection on the drawing, select the command Connection Properties... from the displayed context menu and select the Wires tab, or
-
select the desired connection on the drawing, select the command Format -> Connection Properties... from the Main Menu bar and select the Wires tab.
The following dialog box is displayed:
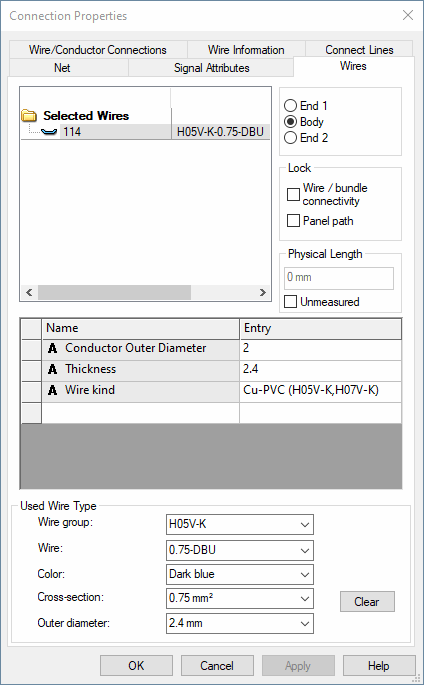
The top part of the dialog box displays a Tree View for selection of the wire group and/or individual wires to be changed and three radio buttons for the selection of the end or the body of the wire group / wire (End 1 / Body / End 2).
The middle part of the dialog box contains the table for the specification of attributes.
To add additional attributes, select the empty Name field and left-click again to display a drop-down list box, displaying all of the available attributes for the selected wire, from which a selection can be made. Attributes that can be used once only and have already been associated with a wire, will not be displayed again in the list.
Select the Entry field to display a drop-down list box, containing all of the values that have already been used for that attribute within the project. If the required value does not exist, type in the new entry in the field.
Click on the Entry field containing a translatable text and press F3 to display the Translation Table dialog box. As in Database Editor mode individual columns can be sorted in ascending or descending order. Texts can be selected from the database.
Attention
The dialog box will not be displayed, if the entry field is editable (a field is editable, if the drop-down arrow is displayed at the right edge of the field).
|
Wires |
|
|---|---|
|
End 1/Body/End 2 |
Defines which attributes (the end or the body of the wire) will be shown in the section below (Name). |
Lock |
|
|
Wire/bundle connectivity |
With this option, it is possible to prevent the connection logic of conductors and wires from being changed.
When this option is checked, then the conductor/wire may not be disconnected from the pins to which it is connected. A conductor/wire provided with this characteristic, may not be deleted.
It is thus no longer possible, to disconnect or reconnect the wire/conductor using the commands Unconnect Conductors or Reconnect Conductors.
Other commands that also accomplish these actions (for example placement of a symbol on a connection, in which a wire is already laid) will not work for these wires.
Only when this option is unchecked can the wire be reconnected. |
|
Panel path |
When this option is checked, then the physical routing path in the panel becomes blocked.
In the circuit diagram this option does not have any impact. The wire remains existing in the project. |
Physical LengthDefines the physical length of the selected wire. |
|
|
Unmeasured |
When this checkbox is activated, the wire length is not determined by the system but by what is defined here. The field for specifying the physical length is only active, when Unmeasured is checked.
Rules
|
Attributes |
|
|
Name |
A new attribute can be added in the last line of the Name field in the table. The list displays all attributes permissible for wire groups / wires.
The Name fields display additional information that can be associated with a wire group / wire, e.g. Description, Material, etc. |
|
Entry |
The Entry fields allow you to enter corresponding information directly into the field or to select existing entries from a drop-down list and to modify them if required.
The list displays all entries defined for that attribute within the project. |
Used Wire Type |
|
|
Wire group/Wire/Color/Cross-section/Outer diameter |
Once all lists have been reset using the Clear button, you can specify the required wire.
Select the individual fields to display drop-down list boxes, containing all available values.
The 'Outer diameter' field serves for information only and can thus not be edited |
|
Clear |
If you want to change the wire type, press the button 'Clear' to reset all entries (wire group, wire, color, cross-section, outer diameter). |
Variants/OptionsThis part of the dialog is only displayed if variants have been defined in the project and the Standard Mode is active. |
|
|
Variant to change for |
Selection of the variants you want to change in the dialog. Before making modifications, the desired variant has to be defined.
If a wire cannot be laid in a connection, this is inhibited. If a standard wire is to be laid in a connection that belongs to an option, the wire is immediately assigned that option.
Conductor / signal logic lines are displayed accordingly for variants. |
|
Create new instance |
A new instance of the wire is created for the variant. |
|
Set changes to default |
This button resets changes made to the set variant. |
The attributes are assigned to all wire groups / wires that are selected in the Tree view. Depending on the options selected, the attributes apply to the body or to one of the ends.
To delete an attribute, right-click on the left (gray) column of the table, adjacent to the attribute to be deleted, and select the Delete Attributes... command from the displayed context menu.