
Text Translation based on a Text Database
Text Translation based on a Text Database
To edit the Translation Table in E3.series,
-
start the Database Editor and select the Translation Table... command from the Format main menu.
To display the Translation Table for selection of an entry,
-
select a dialog box containing an entry list with translatable texts and press hotkey F3.
The following dialog will be displayed:
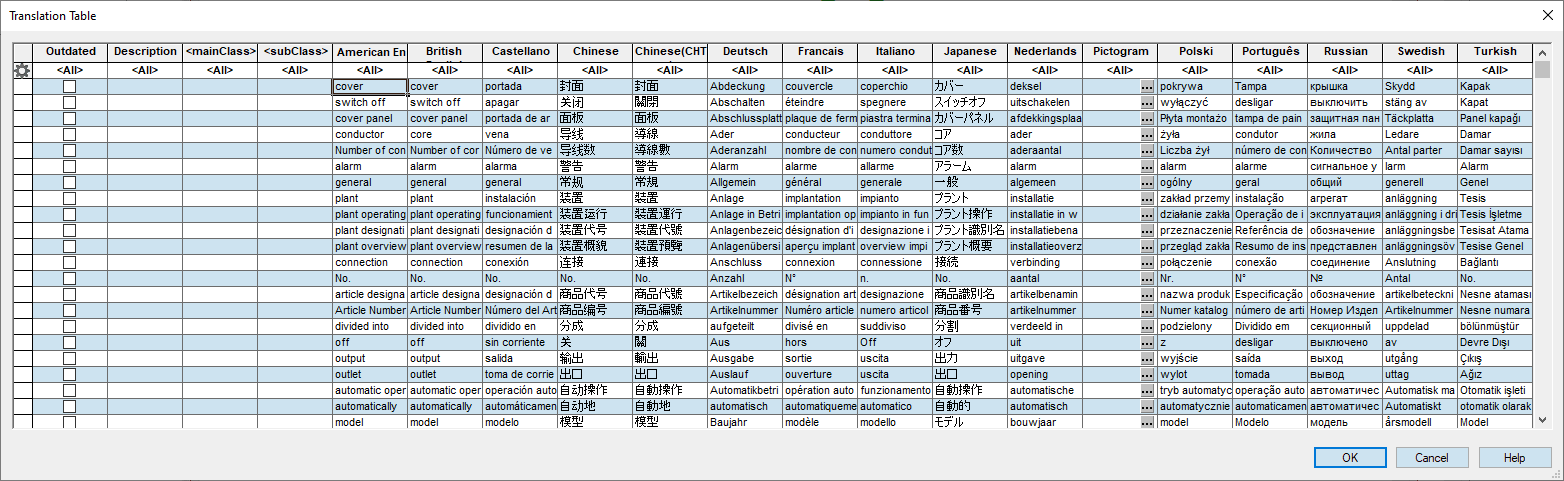
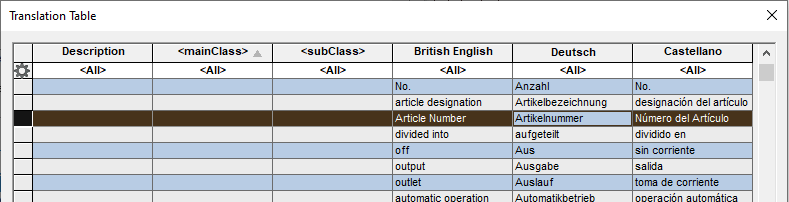
The dialog displays all of the entries for the different languages.
The desired text is inserted by
-
double-clicking in any field
-
double-clicking in any row
-
selecting any field and pressing the RETURN key
-
selecting any field and pressing OK.
In Database Editor mode, these entries can be edited as required and completely new entries can be added at the bottom of the table.
The displayed languages are sorted according to the first language defined in the Settings.... In case no language has been defined, the system displays all languages contained in the languages database.
Note
Text fields that are "empty" after switching languages in the Translation Table, are displayed as follows:
-
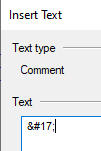
If no translation exists yet for the translatable text, the internal display is as follows: &#<num>;. Therefore, the untranslated texts are immediately visible in the plan. This display is also active in other output formats (PDF, DXF and WebView, printer etc.).
-
If no language is activated in the project, likewise only internal numbers are displayed.
The following functions are available in the Translation Table
-
Filter entries
-
Sort entries
-
Delete entries
-
Add / delete language
-
Display of translatable text parts by use of translation table
-
For translatable text parts from the translation database, parameters can be defined by use of a placeholder
Filter Entries
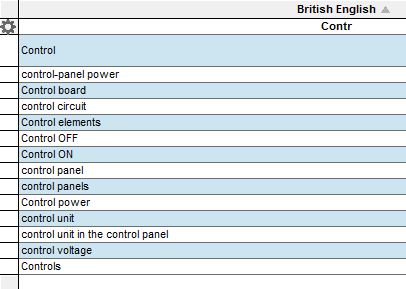
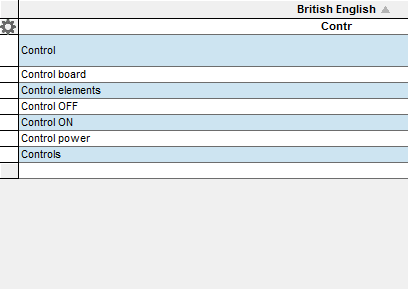
Using a filter can limit the output additionally if needed. For this purpose, left-click in the second line of the translation table (predefined value: <All> and the desired language column. Insert the desired search term to filter.
Note
-
It is recommended to set an asterisk before and/or after the term to be searched for and to insert the search term letter-by-letter: *Search term*
-
For reset of filter insert one asterisk only: *
There is the possibility to search/filter for further texts (not necessarily for the description as it shall be unique) in the text database.
With that, the user is able to clearly describe a text. Additional filter columns can be added when editing the text database within the database editor mode. They have the form <Column name> and are displayed always before all defined languages within the
Example
When e.g. the term Fluid has been inserted to the column <Class> for each existing fluid type in the database editor mode at editing of text database, it can easily be sorted or filtered for the existing fluid types.
There are two context menu commands for filtering
- Match case
- Match whole word
To activate/deactivate these filter functions
-
start the Database Editor and select the main menu command Format -> Translation Table... or select a dialog in project mode, which contains the entries with the translated texts and press F3.
-
right-click on the first or second cell in the first column of the Translation Table
-
select the desired filter function from the displayed context menu
Note:
If a filter function is active, the selection is highlighted in the context menu command.

Match case
-
If the filter function Match case is inactive, all matching terms are displayed (independent of whether they are upper or lower case).
-
If the filter function Match case is active, all terms matching the appropriate case are filtered.
Example
The filter function Match case is deactivated.
The filter function Match case is activated.
Match whole word
-
If the filter function Match whole word is inactive, all matching terms beginning with the corresponding value are listed while entering them in the filter line.
-
If the filter function Match whole word is active, the matching terms beginning with the corresponding value are listed while entering in the filter line. When exiting the filter line, those terms with the exact value are listed.
Example
The filter function Match whole word is deactivated or the filter function Match whole word is activated and a value is entered in the filter line.
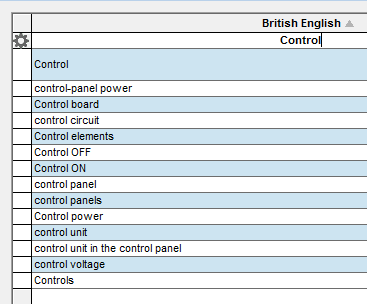
The filter function Match whole word is activated and the input field displays only one entry upon leaving the filter line (by clicking the Return key).

Sort Entries
The entries in the translation tables can be sorted ascending / descending for each column.
How to sort a language column
-
Double left-click the column heading of the desired language.
The column content will accordingly be sorted ascending/descending.
Delete Entries
Existing entries can completely be deleted in the translation table for all languages.
How to delete an entry in the translation table
-
Right-click the left (gre
 in the displayed context menu.
Mark Entries as Outdated
These options are only available in Database Editor mode!
Entries in the translation table can be marked as outdated.
Outdated terms in the language database are no longer offered for selection.
Click on the checkbox in the column Outdated to mark the term as outdated.
Filter by Outdated Entries
These options are only available in Database Editor mode!
It's possible to filter by outdated entries in the translation database.
Enter "1" in the second line of the column Outdated to display all outdated terms.
Enter "0" in the second line of the column Outdated to filter out all outdated terms.
Enter "*" in the second line of the column Outdated to reset the filter.
Add / Delete Language
These options are available in the database editor mode only!
Further languages can be added or existing languages can be deleted in the translation table.
How to add further languages to the translation table:
-
Right-click on any region in the first line of the translation table.
-
Select the command Add language in the displayed context menu.
How to delete an existing language in the translation table:
-
Right-click on the first line of the language column to be deleted within the translation table.
-
Select the command Delete language in the displayed context menu.
Displaying Translatable Texts Using the Translation Table
Note
Translatable texts are stored in the format &#<num>; and displayed in project in the defined language.
Translatable texts can be used with
-
signal names
-
wire names
-
slot names
-
text and attribute texts
Signal names
-
Right-click on the desired connect line and select the Connection Properties... command from the displayed context menu,
-
and switch to the Signal Attributes tab in the Connection Properties dialog box.
-
Select the desired signal under Signals, then press the F2 key or the blank key,
-
and click on the
 button.
Wire names
-
Select the desired wire in the Device tree and press the F2 key.
-
Then click on the
button.
Slot names
-
Click on the desired slot in Database Editor and select F2,
-
select the button
.Note
Slot names in project mode are displayed only and cannot be assigned or modified.
The translation code is translated only in the first project language defined.
Texts
-
Right-click in the drawing area on the desired text and select the Text Properties... command from the displayed context menu.
-
The translatable text can be entered in the entry field in the Text section.
Attribute texts
The following is valid for attributes texts in 'Properties' dialog boxes (Graphic Properties, Connection Properties, etc.):
-
Double-click in the 'Properties' dialog's Entry field of the desired attribute and
-
click on the
button.
Example
British English, German and Spanish are selected as project languages for the translation table under Tools -> Settings -> General -> Language.

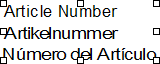
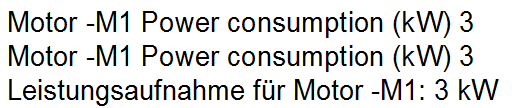
The example shows the translatable text node  accessing the 17th entry (ID number 17) of the translation database for the corresponding text translations:
The texts for translatable text nodes are displayed in the languages defined in the Settings:
![]()
It's also possible to define the output language(s) using a bit field. This bit field is specified using a decimal code behind the translatable text node (see table). If no additional decimal code is defined, all defined languages are output.
Example
(3 languages from the translation database are selected in the following table. Up to 5 languages can be selected.)
|
Internal display + decimal code |
Binary code |
Language output |
|---|---|---|
|
&#<num>;/0 |
- |
No text from the translation database is output. |
|
&#<num>;/1 |
0 - 1 |
1. language |
|
&#<num>;/2 |
1 - 0 |
2. language |
|
&#<num>;/3 |
1 - 1 |
1. language + 2. language |
|
&#<num>;/4 |
1 - 0 - 0 |
3. language |
|
&#<num>;/5 |
1 - 0 - 1 |
1. language + 3. language |
|
&#<num>;/6 |
1 - 1 - 0 |
2. language + 3. language |
|
&#<num>;/7 |
1 - 1 - 1 |
1. language + 2. language + 3. language |
|
&#<num>;/8 |
1 - 0 - 0 - 0 |
No text from the translation database is output. (since only 3 languages are defined in the example) |
Note
If a number follows the translatable text, a back slash must be used as 'separator' between translatable text and number.
Example
&#<num>;/3\345465445
Parameter Values Can Be Defined using Placeholders for Translated Text Nodes from the Translation Table
A parameter value can be defined for translated text nodes using a placeholder. This placeholder is created in the Translation Table in the Database Editor. In later projects the real parameter value is defined in the text.
To create the placeholder in the Database Editor
-
Create the placeholder in the Translation Table using the character combination %s
Note
If %s is to be used as text and not as a placeholder, then use the following: \%s
-
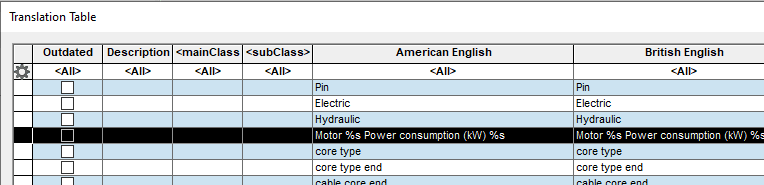
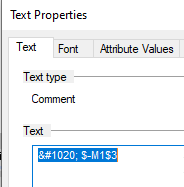
Enter the desired text in the required language along with its placeholder (see example with text node ϼ):
-
Save the modifications in the database.
To define the parameter value in the project
-
Execute the command Update configuration in project
-
Insert the translated text node (in the example ϼ) in the project:
-
The parameter value is defined using a dollar sign $:
Note: If the dollar sign $ is to be used as text and not as a parameter value, then do so as follows: \$
-
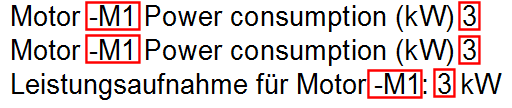
The text is now displayed with the defined parameter values:
Note
-
If no parameter value is defined, an empty space appears in the text.
-
For multiline texts the parameter value must appear at the end of the text.
Pictograms Can Be Used as a Language
In E3.seriespictograms can be used as a 'language'. In doing so, the pictogram is defined as a translated text node in the Translation Table. The translated text nodes can be displayed afterward in Project or Database Editor mode as either a pictogram or as text.
Preparations
Create the Language 'Pictogram' in the Database Editor
For starters the new pictogram language Pictogram must be created in the Translation Table.
To do so, proceed as follows:
-
select the command Tools -> Start Database Editor in the main menu toolbar,
-
this starts the Database Editor,
-
select the command Format -> Translation Table... in the main menu toolbar,
-
this opens the Translation Table dialog,
-
right-click on the uppermost line and select the context menu command Add Language,
-
enter the language Pictogram as the new pictogram language in the New Language dialog.
Select the Pictogram
Select the desired pictogram for the translated text.
To do so, proceed as follows:
-
select the line in the Translation Table with the desired translated text ,
-
left-click on the selection field ... in the language column Pictogram

-
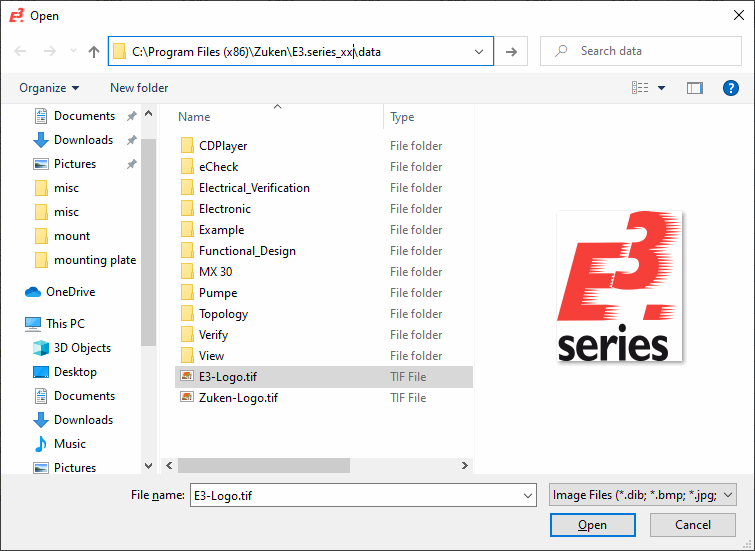
select the desired pictogram in the Open dialog:
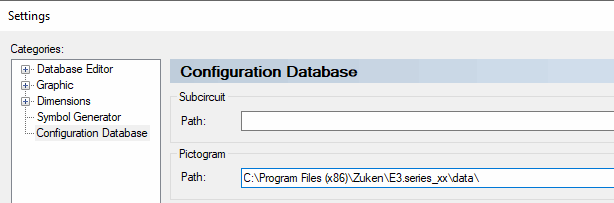
Note
In the Database Editor under Settings - Configuration Database in the section Pictogram a default directory can be defined. This directory displays a predefined path for the pictogram folder and appears first when selecting the pictogram:
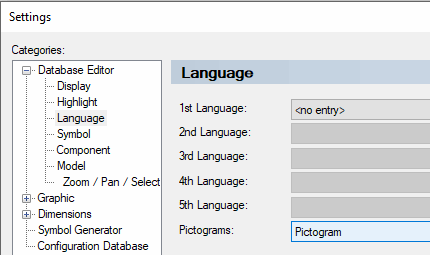
Define the newly created language Pictogram as a language used in Database Editor mode.
To do so, proceed as follows:
-
open the Settings in Database Editor mode (Tools -> Settings -> Database Editor -> Language),
-
select the language Pictogram in the field Pictograms:
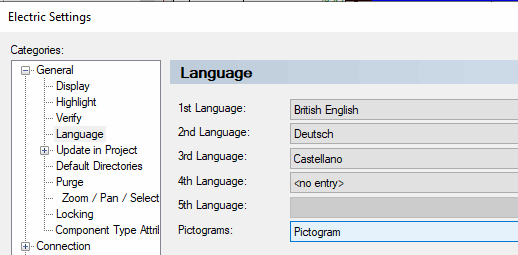
Preparations in Project Mode
Define the newly created language Pictogram as a language used in Project mode.
To do so, proceed as follows:
-
open the Settings in Project mode (Tools -> Settings -> General -> Language),
-
select the new language Pictogram in the new field Pictograms:
Use Pictogram in Database Editor Mode or Project Mode
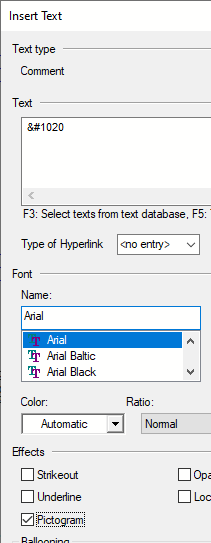
In the Insert Text or Text Properties -Text dialog the translated text node can be output as a pictogram.
To open the Insert Text dialog
-
select the command Insert -> Text... in the main menu toolbar
To open the Text Properties -Text dialog
-
right-click on the text and select the context menu command Text Properties...
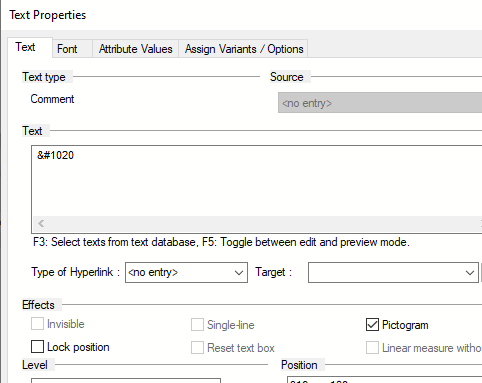
By pressing the F3 key the translated text can be selected from the Translation Table.
-
Activate the new check box Pictogram in the section Effects to display the translated text node as a pictogram
-
Deactivate the new check box Pictogram in the section Effects to display the translated text node as text
The pictogram is displayed as translated text:

Note
-
The pictogram is output in a defined size and cannot be changed
-
The position, rotation and justification of the text are used for displaying the pictogram