
Connection Properties / Signal Properties - Signal Attributes
To display/modify the properties of a signal,
-
right-click on a connection line and select Connection Properties from the displayed context menu. To select more than one connection line for modification, hold down the shift key, then left-click on each of the desired lines and right-click on the final line to display the context menu.
-
Or left-click on a connection line to highlight it (or for multiple lines, left-click on each line while holding down the 'shift' key) and select Format -> Connection Properties on the Main Menu bar.
The dialog box Signal Properties - Signal Attributes with the same contents appears when,
-
right-click on a signal in the Signal Tree and select Signal Properties... from the displayed context menu (for multiple signals, left-click on each signal while holding down the 'shift' key before finally right-click on the last signal).
A dialog box appears in which you can modify the properties of the signals.
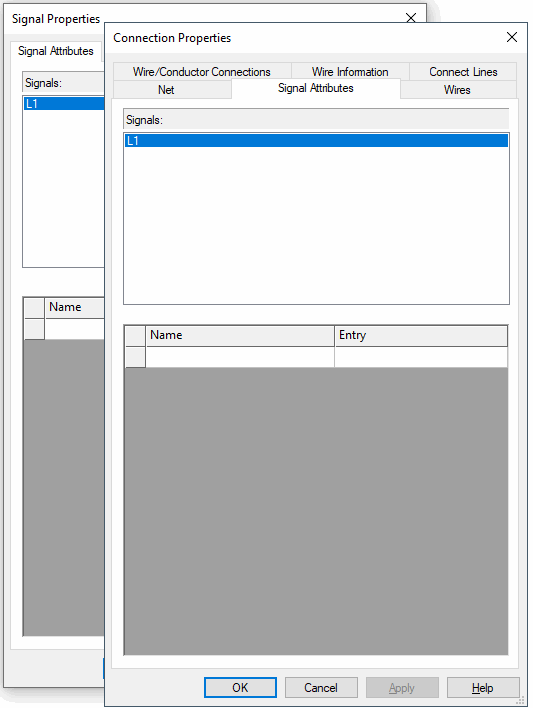
The top part of the dialog displays a list field for selection of the signal, the attributes of which are to be changed.
The bottom part of the dialog box contains the table for the specification of attributes.
To add additional attributes, select the empty Name field and left-click again to display a drop-down list box, displaying all of the available attributes for the selected signal, from which a selection can be made. Attributes that can be used once only and have already been associated with a signal, will not be displayed again in the list.
Select the Entry field to display a drop-down list box, containing all of the values that have already been used for that attribute within the project. If the required value does not exist, type in the new entry in the field.
The checkboxes to the left of the Name field are used for controlling the visibility of the text associated with the attributes (e.g. with Insert->Attribute text). These checkboxes are inactive if no text has been placed for the attribute. Check the related checkbox to place text for an attribute. A corresponding piece of text is placed in the middle of each selected connection line.
Click on the Entry field containing a translatable text and press F3 to display the Translation Table dialog box. As in Database Editor mode individual columns can be sorted in ascending or descending order. Texts can be selected from the database.
Attention
The dialog box will not be displayed, if the entry field is editable (a field is editable, if the drop-down arrow is displayed at the right edge of the field).
|
Signal Attributes |
|
|---|---|
|
Signals |
Displays the selected signal. The Connection Properties -> Signal Attributes dialog allows you to rename signals.
To rename a signal, select the corresponding row displaying the signal name and simply type in the new name or press the space bar to start edit mode and then type in the new name.
NoteDouble-click on the desired signal to display the
Only valid signal names, that do not yet exist in the project, are accepted. It is not possible to exchange two signal names (A->Z,B->A,A->B), without confirming each change by clicking on Apply/OK. |
|
Name |
Defines the new attribute for the selected signal. |
|
Entry |
The user can either select an existing value from the drop down list, or enter a new one. <No entry> means that the attribute has no value assigned to it. |
Variants/OptionsThis part of the dialog is only displayed, if variants/options have been defined in project and the Standard Mode is active, but is inactive with this tab. |
|
 button. Clicking on this button opens the
To delete an attribute, right-click on the left (gray) column of the table, adjacent to the attribute to be deleted, and select the Delete Attributes... command from the displayed context menu.
Remarks on Wire Selection for Automatic Wiring
For each signal the user can define default wires, which are used for automatic connections in the panel and for automatic creation of the wires during normal connections.
If no default wires are defined at the signal, then the system default wire type is used (as before).
If several default wires are defined at the signal, then the 'most suitable' wire will be used (regarding the cross-section of the connected pin).
For this purpose there is the system attribute .WIRETYPE_FOR_AUTOCONNECT. It has the following characteristics:
-
Owner = Signals
-
Can exist several times
-
Unambiguous at the owner
For assigning this attribute, please proceed as follows
Open the Signal attributes tab in the Connection Properties dialog box and select the Standard wire type attribute (.WIRETYPE_DEFAULT).
All wires existing in the wire groups are listed in the drop-down list (database and project). The form is
<wire type name> <wire group name> <wire section> <wire color>.
The list can be limited for each signal as follows
Determine the minimum of all minimum cross-sections for each pin physically described, as well as the maximum of all maximum cross-sections. The resulting interval forms the limits for the list.