
Placement of a Subcircuit
Predefined subcircuits can be stored in the E3.series database. These standard circuits can then be used to complete other circuits.
The structure of the Database Window allows you to easily find subcircuits. Subcircuits are located in the Subcircuits folder in the Component Tree View and each subcircuit is displayed in the Preview Window as soon as it is highlighted in the Database Window.
Note
subcircuits can be stored in any suitably defined folder.
To place a subcircuit,
-
left-click on the desired subcircuit and then select the Place Subcircuit command.
-
When pasting the subcircuit into the drawing using the Paste Extended Subcircuit command, the subcircuit is first inserted into a clipboard and Device Designation, Higher Level Assignment and Location can, for example, be edited before merging. All elements in this clipboard structure tree whose names already exist in the project and thus lead to collisions, are highlighted in red (see also: Paste extended)
-
-
Or left-click on a subcircuit, keep the mouse button pressed and drag the subcircuit using Drag&Drop into the drawing. Release the mouse button to place the subcircuit on the drawing.
The subcircuit is displayed at the cursor’s position and can be placed on the sheet by simply releasing the mouse button.
Definition of the origin on subcircuit creation
To simplify creation and re-use of subcircuits, especially in scripts, the origin can be defined when the subcircuit is created.
The following buttons are available for toolbars:
-
Place origin for subcircuit

-
Display origin of subcircuits

These buttons are only active in Project mode. The Place subcircuit origin button is used to place the origin, similar to placing a symbol origin in DBE mode, and is only active when the Display origin button is active.
The buttons' arrangement can be configured in the Tools -> Customize -> Commands dialog tab (Place and Display categories).
Display and placement of a subcircuit origin
Placement of a subcircuit origin is only possible if the Display Origin button is pressed. It's possible to hide the origin for further modification of the circuit diagram or when printing.
To delete an origin, right-click on it and select the Delete command from the displayed context menu.
When an origin is placed, the symbol is always selected (even if it is hidden) and thus saved along with the related subcircuit during Export or Cut/Copy commands.
As it is possible to place several origins, when a subcircuit is exported (without checking the Include Sheet Border and the Devices only options) that includes several origins, a message is displayed
Multiple origins selected - this may cause an undefined reference point for import.
The user has the choice to either cancel the command or to continue. If continue is selected, one of the origin symbols will be used as reference point when importing the subcircuit).
Note
-
For an import, the position of the origin is chosen as the reference point for the cursor. Upon placement, the origin remains and is used by subsequent export- or move commands.
-
During move actions, especially Drag&Drop, the cursor will not jump to the origin point.
-
The origin is not displayed in the preview window for subcircuits.
-
Independent of the display options, origins are not output when exporting in DXF/DWG- and Webview Format.
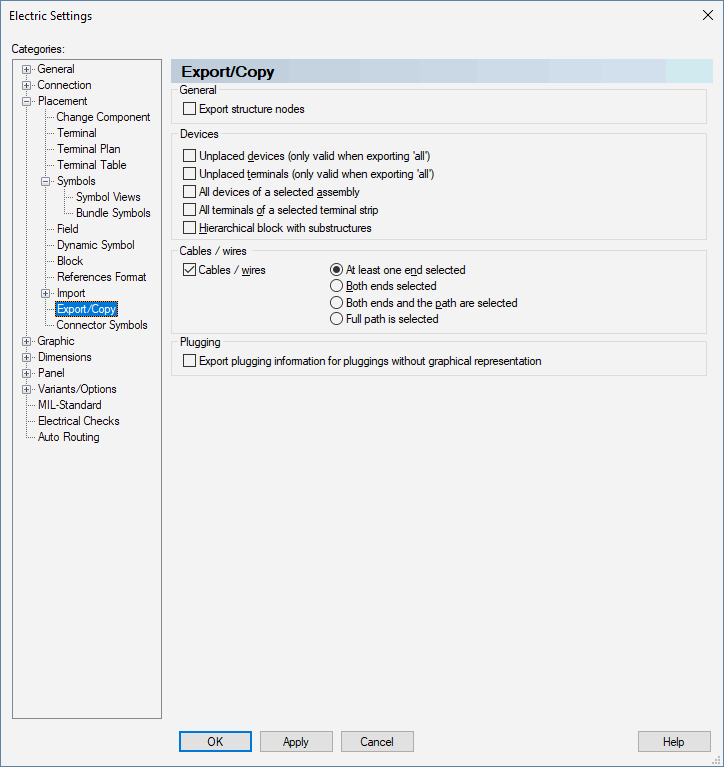
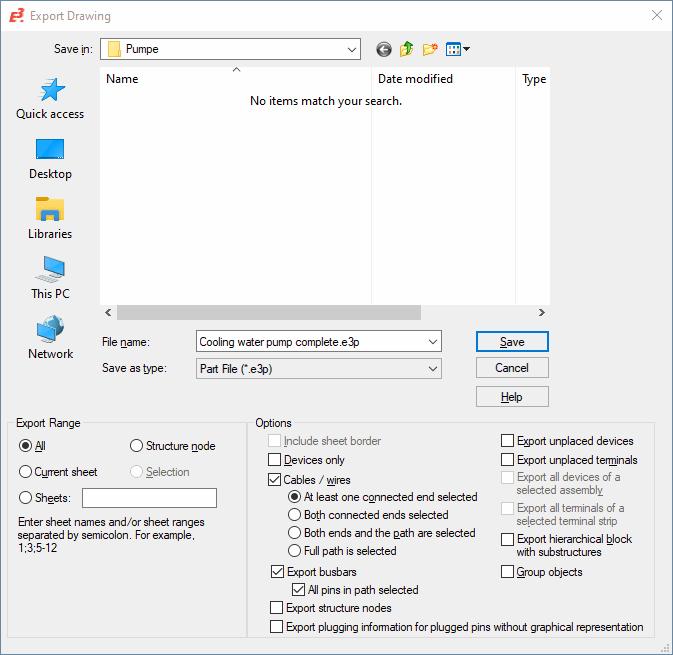
Importing / Exporting Subcircuits
To import / export subcircuits, use the File -> Import -> Drawing / File -> Export -> Drawing command. Various settings can be defined that can either be specified in these dialog boxes or in the Settings -> Placement -> Import / Settings -> Placement -> Export / Copy dialogs.
Note
When subcircuits are exported that have at least one duplicate object ID, new object IDs are assigned in the exported subcircuit. Please consider the corresponding message in E3.series.
Note
When subcircuits are imported that have at least one duplicate object ID, problems may occur when updating in project. Please consider the corresponding message in E3.series. Confirm the message with Yes to still import the subcircuit. Select No to cancel the import.
Updating SubCircuit Groups
Object groups that were imported to the project as subcircuits can be updated. To do so, the object group needs to be exported as subcircuit. Select the desired sheet where the group is placed or select the desired objects that are to be exported as group.
Then select the File -> Export -> Drawing command from the Main menu bar or from the Sheet tree view's context menu and check the Group objects option in the displayed dialog box to group the previously selected objects and export them as subcircuit.
Note
This option can only be activated when the selected objects are not grouped yet. Objects that are already groups in the drawing are automatically written to the subcircuit as a group, thus this option is redundant in this case.
Then, this subcircuit group needs to be stored to the database to be able to update it later in the project. To do so, open the Component Wizard and create a new component of the type Subcircuit. The next step when creating a subcircuit (in the Component Wizard - Subcircuit dialog) is to select the previously generated subcircuit
In the last dialog box (Component Wizard - Complete) the new subcircuit can be finished and saved to the database.
There are two possibilities to update a grouped subcircuit in the project:
-
To update the grouped database subcircuit in the project, right-click on the desired subcircuit in the database tree view and select the Update in project command from the displayed context menu.
-
To update a grouped subcircuit already placed in the project, right-click on the desired group in the drawing and select the Group Properties command from the displayed context menu. Check the Update in project option in the displayed dialog box to update the subcircuit.
The following objects remain existing in the project when executing the Update in project command:
-
Devices, connectors, block connectors, cables
Item Designation, component name and the attributes according to the settings.
-
CoresConductors / wires
Conductor name and the attributes according to the settings.
-
Signals
When existing, the attributes according to the settings.
-
Sheet
Item Designation, sheet name, attributes and text parameters according to the settings and the sheet structure within the structure.
-
Symbols
Symbol designation, text parameters according to the settings and the conductor assignment.
-
Net
Signals and the attributes according to the settings.
-
Net segment
Attributes according to the settings.
-
Sheet references
References from the project remain existing.
-
Hierarchical ports
Hierarchical port names and the reference to the second Hport cell.
-
Groups
Attributes according the settings.
-
Connect lines
First, all lines of the group are disconnected from the other lines. The system then tries to recreate all connections.