
Defining Symbols
What is a symbol?
A symbol is a circuit element which can be assigned a component. As many components use the same circuit elements symbols only have to be described once in the database. They can then be assembled in any combination and used in several components.
Start the Database Editor (see Database Editor) and start Symbol creation by selecting:
-
the New Symbol command on the object menu by right-clicking on the header of the Component column in the Component View of the Database Window
-
or the New command on the object menu of a symbol by right-clicking on a symbol in the Symbol View or Misc View of the Database Window or by right-clicking on the column header
-
or by starting the Component Wizard's Symbol Generator using the command New or New Component displayed in a component's context menu in the Database Window.
A new working area (drawing sheet) named Symbol Type NewSymbol#' is created.
Its size depends on the size defined in the Tools -> Settings-> Database Editor -> Symbol dialog box. The origin of the new symbol is placed in the middle of the working area.
The grid display can be activated using View -> Rulers and/or -> Grid from the main menu bar and modified using Tools -> Settings -> Database Editor -> Symbol.
To create a symbol, proceed as follows:
-
Define the symbol graphics
-
by using the graphic draw commands on the Graphic Toolbar
-
by defining the display order of the graphic objects using the Display Order command from the graphic object menu. When saving a symbol graphic in Database Editor, its graphics are created in the currently active order that will also be displayed accordingly when placing it in the project.
- by placing existing symbols from the Tree View of the Database Window using
the Place as Graphic command from the symbol object menu to place the graphical elements of the symbol only or
the Place as Symbol command to place the graphical elements of the symbol, and also the text nodes and pins.
-
-
-
Select and place the pre-defined connection symbols, so-called Node Templates, from the Database Symbol Node Toolbar, by first selecting the required symbol (e.g. Connect Right) from the drop-down list and then by selecting the Single Node button
 . During placement of the symbol, the system displays both the connect direction and a box symbolizing the text nodes.
 -
As soon as the toolbar button
 (or the command Edit -> Order Definition -> Node) is pressed, the pin sequence will be displayed. By clicking on the pin symbols in the desired order, the sequence will be changed. The <ESC> key terminates the command.
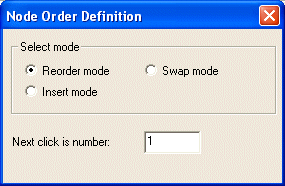
Reorder mode: The pins are incremented. The Next click is number field allows you to specify a start value that is automatically incremented by 1 on each click. Press the <ESC> button to terminate the command.
Swap mode: The pin that has the number indicated in the Next click is number field is exchanged with the pin on which you click.
Insert mode: The pin that has the number indicated in the Next click is number field is placed at the position on which you click.
Following pins are incremented.
-
-
Definition of the required text nodes
-
Define the text order for pin names by means of the toolbar button
 . Alternatively, select Edit -> Order Definition -> Text. The following dialog box will be displayed:
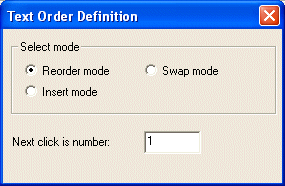
Reorder mode: The texts are incremented. The 'Next click is number' field allows you to specify a start value that is automatically incremented by 1 on each click. Press the <ESC> button to terminate the command.
Swap mode: The text that has the number indicated in the Next click is number field is exchanged with the text on which you click.
Insert mode: The text that has the number indicated in the Next click is number field is placed at the position on which you click.
Following texts are incremented.
-
The display mode of the pin names can be toggled between a node #, a description and a simple location marker (an 'X') by selecting the Num, Typ or Text button on the Database Symbol Text toolbar (represented as '#3', as 'Pin Number' or as 'X').
-
Place user-defined text nodes. This is done by selecting the Text
 button on the Database Symbol Text toolbar, which displays the Insert Text dialog box. The text node can be selected from the Text type Drop-Down menu. For Device Designations, Component Codes, Symbol Designations, etc., the Text field is left empty, whereas, for Symbol Texts, Sheet Texts, etc., a value may be entered. Once placed, the text node can be changed as required by simply clicking on it and selecting a new text type from the Symbol Text Drop-Down list on the Database Symbol Text toolbar
  .
. -
Some text nodes, for example for pin names or signal names, must be attached to a pin. To do so, select the required objects (pins and text nodes) and activate the 'Group' command from the displayed context menu. This attaches the text to the related pin. That attachment can be removed again by selecting the 'Ungroup' command from the context menu displayed when clicking on the text node. The attachment can be displayed by left-clicking on one of the texts to display logic lines between the nodes and the pin.
-
-
Symbol type, symbol name, version, version text and the desired attributes are defined in the Symbol Properties object menu. The symbol's description makes it easier to find the symbol using the search system in the database.
-
Symbol names are limited to 64 characters.
-
Signal references can be up to 230 characters (200 for the signal name and 30 for the reference name) and can comprise space characters.
When displaying the signal name in a Tooltip the line is broken after 100 characters.
-
Blank characters are allowed in symbol names.
-
Database conversion for symbol names allows a maximum of 255 characters
-
-
Existing symbol text can be modified by first selecting it on the sheet and then by making the required modifications in the corresponding toolbars (font type, size and format in the Text Format Toolbar and text type, alignment, orientation and display mode in the Database Symbol Text Toolbar).
As, especially when importing data from external systems, the reference texts might not correspond to the other texts that can also exist on such symbols, the text types Sheet Reference (#206) (represents the cross-reference of multiply split blocks) and Sheet Reference (#1037) are available.
Click here for a more detailed description of the text type.
They allow you to define for each individual reference symbol, where and how the reference text is to be placed.
In case a reference symbol is assigned to this text type, no global reference will be added to this symbol.
-
The cross in the middle of the drawing area displays the symbol's origin. The Symbol Origin toolbar button
 is used for moving it to another position.
 -
The Edit Space Requirements
 and Fit Space Requirements
  buttons are used for defining the space requirements of the new symbol.
Finally, the new symbol can be saved to the database by means of the Save to Database command from the object menu or the Edit menu on the Main Menu bar.
Defining a Connector Symbol
Symbol type: Connector
See also: Symbol Definition - Connector Symbol
For this special type of symbol, please note:
The mating connector is connected from the LEFT side and the electrical connection from the RIGHT side. This is necessary because the mating connector symbol must automatically adapt to where the connector symbol is placed.
-
Origin (reference point)
The origin will be used as the starting point for the electrical connection and placed on the RIGHT side.
-
Pin
This will be used to automatically place the mating connector if the connector is used as the mating connector. If the connector is placed as a 'standard component', the mating connector will also be placed on the pin. This means that pins from both components will be placed on one another. The pin will be defined on the LEFT side and connected from the left.
Attention
The text type for the pin number must be connected to the pin (context menu Group).
Master symbol (contact list) for connectors
Connectors can also possess a master symbol (analogous to the contact list of a contactor), that shows, by means of cross references, where the individual connector symbols are placed.
Therefore, connectors support also the known text types Reference to Master (#16) and Reference to Slave (#18).
See also: Edit Text Types
Defining a Block Symbol
Symbol type: Block Connector
See also: Symbol Definition - Block Symbol
For this special type of symbol, please note:
The symbol's position will be located on the RIGHT side of the block.
Reason: the symbol will be rotated automatically if it is moved on the block's border.
-
Origin
The reference point will be placed on the block's border, and placed LEFT of the pin.
-
Pin
The pin is automatically used to place the mating connector. This means, that the pins from both components will be placed on one another.
The pin is placed on the RIGHT side and connected from the right.
Defining a Connector View Symbol
Symbol type: Connector
See also: Symbol Definition - View Symbol
These symbols are defined in the same manner as the connector symbols in the database.
Many users will often use the connector's physical appearance (side or overhead view).
Defining a Documentation Symbol
Symbol type: Connector Documentation
These symbols have no pins and are used to preview a component.
Symbols (as well as components and models) that have been changed since they were last saved to the database, are designated by an asterisk at the end of the symbol name in the Database Editor Window.
