
Component Wizard - Generate Symbol
Symbol generation during component creation can be done using the Symbol Generator.
This possibility is especially helpful when creating components / symbols with many pins (e.g. 100 pins) which mainly appear in the field of electronic engineering.
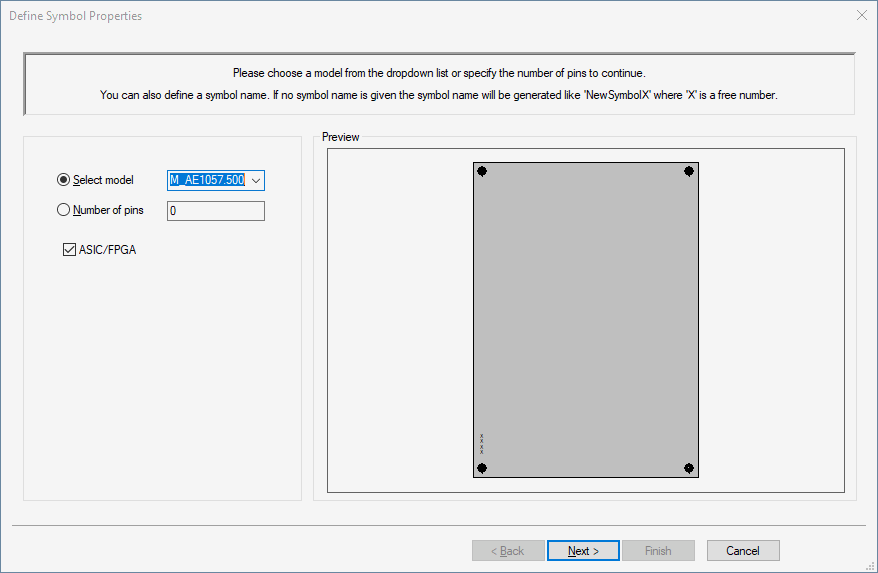
Define Symbol Properties
The following dialog will be displayed when clicking on the Generate Symbol button in the Component Wizard - Structure dialog box when creating a standard device or a terminal.
Either an existing model can be selected as a basis for the new symbol through the option Select model or the number of pins can be entered through the option Number of pins.
Check the ASIC/FPGA option to define an ASIC/FPGA symbol.
By default, this option is checked. The ASIC/FPGA symbol created is displayed in the Symbol Properties after being finished.
|
Define Symbol Properties |
|
|---|---|
|
Select model |
The drop-down list contains all models available in the component database. If an already existing model is selected, it will be part of the new component. |
|
Number of pins |
If an existing model has been selected, the corresponding number of pins is displayed in this field. If no model has been selected, any desired number of pins can be entered. |
|
ASIC/FPGA |
Check this option to create an ASIC/FPGA symbol. This option is active by default. This symbol is displayed in the Symbol Properties after finishing the type ASIC/FPGA. |
Clicking Next> will open the Pin Definition dialog box. This dialog serves for defining the new symbol's pin 'layout'.
Pin Definition
The symbol created in this dialog always has a rectangular shape. The 'pin layout' can be edited as desired. The TAB key can be used to jump from field to field.
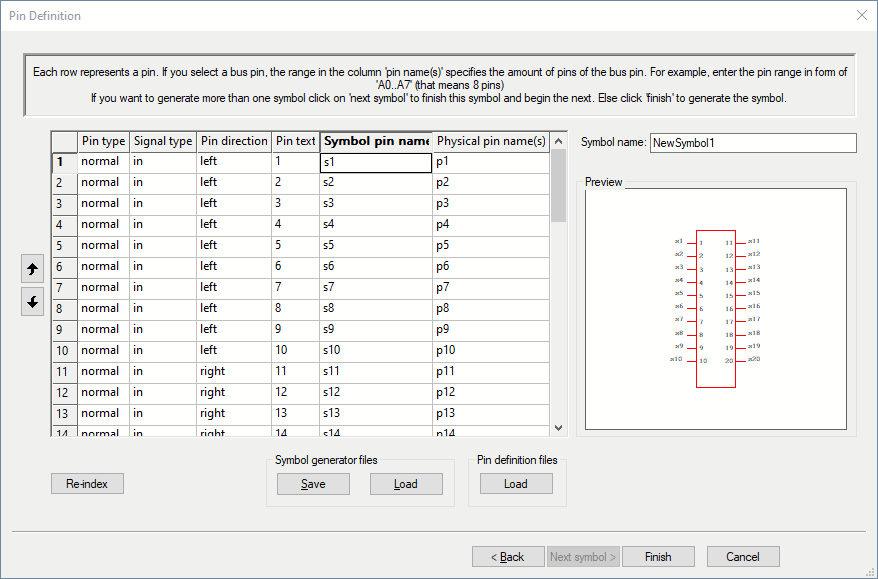
Clicking on the individual column headers sorts the values in the columns ascendingly or descendingly.
The Index column (on the very left) can also be sorted by clicking on its header, so that the rows are displayed sorted by their index number.
|
Pin Definition |
|
|---|---|
|
Pin type |
Defines the type of the pin selected. |
|
Signal type |
Defines the type of the signal selected. |
|
Pin direction |
Defines the position of the pin selected. |
|
Pin text |
Defines and displays the text of the pin selected. |
|
Symbol pin name(s) |
Defines the name(s) of the pin selected. |
|
Physical pin name(s) |
Defines the name(s) of the physical pins selected. These definitions are also stored in the symbol generator file (*.sgm) and can be loaded from there. |
|
Insert row/Insert separator/Delete |
By right-clicking on the first column the context menu appears offering the options Insert row, Insert separator and Delete to either insert a whole row, to insert an empty row separating the one above from the one below or to delete a whole row. |
|
Symbol name |
Defines the name of the symbol to be generated. |
|
Preview |
Displays the symbol with all its pins including pin type, signal type, pin direction, pin text and pin name(s). |
|
Re-index |
The Index column can be renumbered consecutively beginning with 1.
This is useful when the table is sorted according to another column and this sequence should be adopted as the pin sequence. |
|
Symbol generator files |
|
|
Save/Load |
Using these buttons the symbol definition can be saved as *.sgm file for continuing work.
Load will load an already existing*.sgm file, i.e. the contents of an already defined symbol. |
|
Pin definition files |
|
|
Load |
Load will load an already existing file. The following formats are supported:
|
If the pins defined in the Define Symbol Properties dialog shall be placed on two or more symbols, click Next symbol> to define the pin layout of a further symbol.
Selecting Finish after modifying the pins will display a message box asking to save the created symbol to the database. Confirm the message box to return to the Component Wizard's Structure dialog.
The symbol will be saved to the database and stored in the <No Class> folder.
The last step is to finish creation of the component in the Component Wizard's Complete dialog.