
Defining Table Symbols
Start the Database Editor (see Start DBE) to create a table symbol.
Proceed as follows:
-
right-click on the header of the Component column in the Component tree of the Database Window and select the New Symbol command from the displayed context menu, or
-
right-click on a symbol in the Symbol or Misc tree of the Database Window and select the New command from the displayed context menu.
A new working area (drawing sheet) named Symbol Type NewSymbol# is created. Its size depends on the size defined in the Tools -> Settings-> Database Editor -> Symbol dialog box. The origin of the new symbol is placed in the middle of the working area.
The grid display can be activated using View -> Rulers and/or Grid from the main menu bar and modified using Tools -> Settings -> Database Editor -> Symbol.
Defining Symbol Type
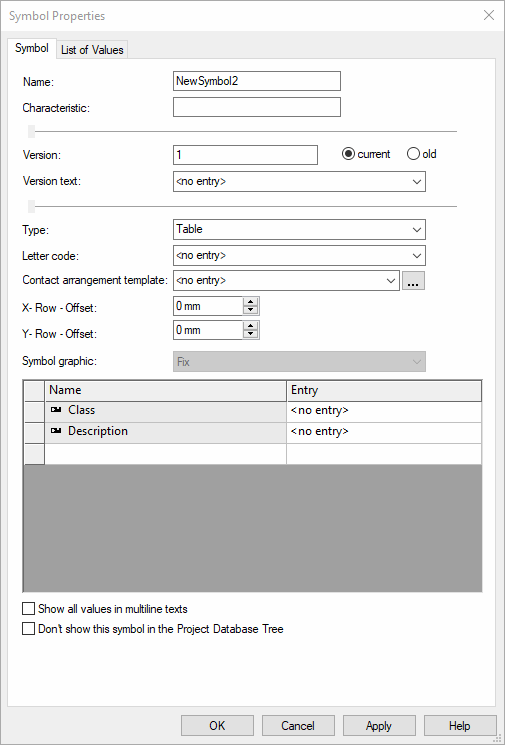
To define the symbol name, its type, description and offset right-click in the working area and select the Symbol Properties... command from the displayed context menu. A table symbol must have the Table type assigned.
The X and Y Offset can also be specified for the rows. This offset defines the number of units, by which the next row is moved when replicating. The offset is valid for the complete table symbol and must thus be defined only once.
Origin
The physical origin of the new table symbol is automatically placed at the center of the working sheet. Using the 'Symbol origin' button ![]() the origin's position can be moved. The Z coordinate is always 0.
the origin's position can be moved. The Z coordinate is always 0.
Then draw a symbol table using the Graphic toolbar (line width, color, level and type).

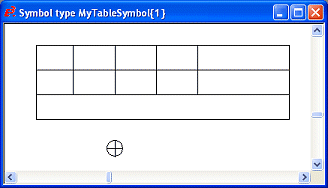
Example
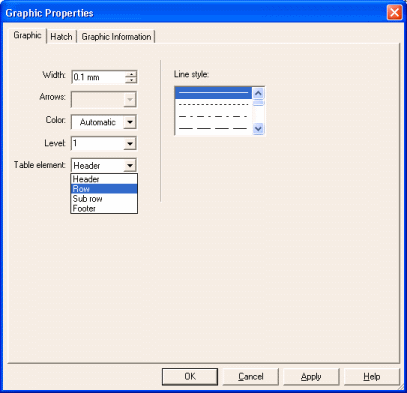
Graphics in the symbol must be assigned to the table's header, row or footer using the Graphic Properties... .
Select the desired table element in the graphic and specify its Table element in the Graphic Properties...:
-
Header
Specifies an unchangeable part of the table and can be compared with normal graphic (or text).
-
Row
Specifies a recurrent part of the table. This part is copied x times and therefore enhances the table.
-
Sub row
Every connector has a table that lists its source pin, connection target and wire information per connection. When there are tow conductors/wires on a pin, an additional row ("sub row") is displayed.
When no sub row table element is defined for the table symbol in the database, the values are separated by commas.
-
Footer
Specifies the table's footer. This part is moved downwards according to the number of rows.
Text nodes
Placing user-defined text nodes
-
Select the Text button
 in the Database Symbol Text toolbar, which displays the Insert Text dialog box.
The text node can be selected from the Text type drop-down menu. For Device Designations, Component Codes, Symbol Designations, etc., the Text field is left empty, whereas, for Symbol Texts, Sheet Texts, etc., a value may be entered.
Once placed, the text node can be changed as required by simply clicking on it and selecting a new text type from the Symbol Text Drop-Down list on the Database Symbol Text toolbar
 .
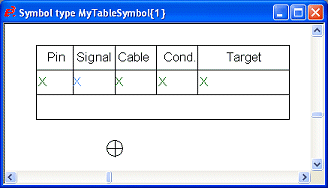
. Example
-
These texts must also be assigned the corresponding table element in the Text Properties...:
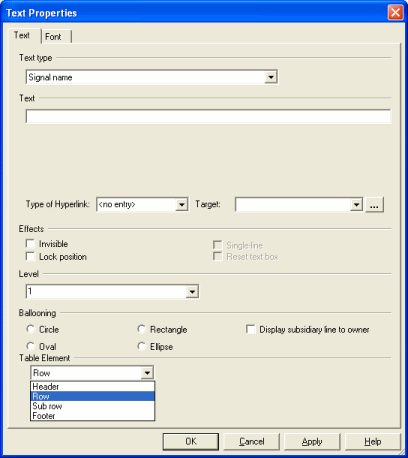
-
Note:
When placing the following text types:
-
7 (Signal name),
-
3 (Pin number),
-
1002 (Connection Target),
-
1003 (1003 (Conductor in connection) and
-
1012 (Cable in connection)
they are automatically assigned the Table element Row.
The table symbol is finished and can be saved to the database by right-clicking on the sheet and selecting the Save to database command from the displayed context menu.
After saving, the table symbol is displayed in the Database window's Misc tree by a special icon
 .
.
-