
Defining Overbraids
Defining Overbraids in Database
It is possible to define cable harnesses, i.e. bundles of cables, wires and mechanic cable protection elements, in the database, that can then be used in project as 'fix' component.
The Component Wizard is automatically started, when starting generation of a new overbraid in the database.
To do so, proceed as follows:
-
Right-click on the header of the 'Component' column in the Database Window's Component view and select the New Component command from the displayed context menu. The Database Editor is automatically started, if not yet happened.
-
Or right-click on a component in the Database Window's Component view and select the New Component command from the displayed context menu.
|
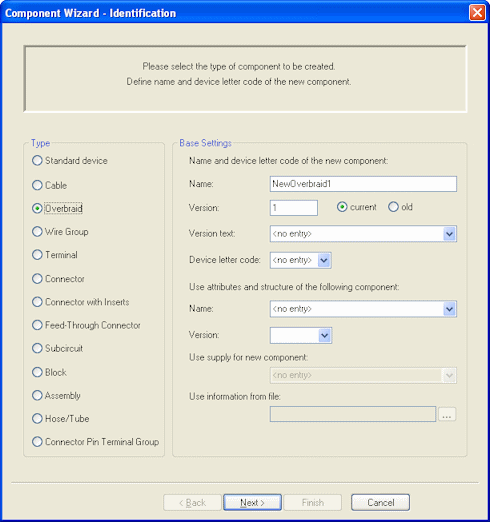
Component Wizard- Identification |
|
|---|---|
|
Type |
Select the type of the component to create: Overbraid. |
Base Settings |
|
Name and device letter code of the new component |
|
|
Name |
Name of the overbraid. When this name already exists in the database, it is rejected, except another version is defined, or the 'old' radio button is checked.
By default, NewOverbraid# is entered.
|
|
Version |
The component's version number is defined. When no version is defined, it is not possible to switch to the next dialog, and a message may be displayed asking the user to specify a version for the component.
The current and old options define, which version is assigned the new component. The current version is displayed in the third column of the Database Window's Component view.
The version status of the 'current' component in the database is instantly changed to 'old' when modifications have been made.
By default, the version of a new component is 1. |
|
Version text |
This text is a descriptive text for the version. The version description can always be changed. |
|
Device letter code |
The Device letter code is the prefix letter(s) used to identify the component when it is placed in a drawing. It can be selected from the drop-down list or entered manually. |
Use attributes and structure of the following component/Use structure of the following component(this option only appears, when Edit is selected on a component without structure) |
|
|
Name |
If the new component is based on an already existing one (activating the New component command on an already existing component in the Database Window's Component tab), the 'base' component's name is displayed in the Name field. This name can be changed.
The component can be selected from the drop-down list which contains all components available in the database. New attributes for the new component can be defined in the Component Properties dialog box and existing attributes can be edited using the Attribute Names command. |
|
Version |
Displays the base component's version. |
Then click Next to switch to the Component Wizard - Properties dialog. The properties of the new component can be specified in this dialog.
Then click Next to open the Component Wizard - Cable Structure dialog.
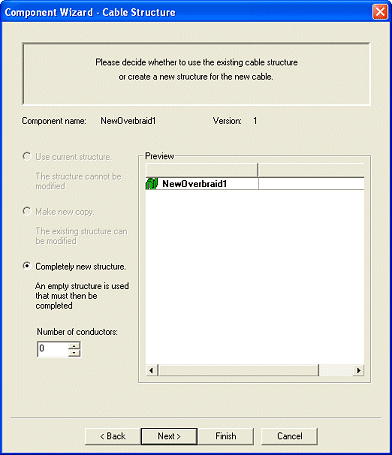
Define the number of conductors for the overbraid in this dialog. The defined number of conductors is shown on the component sheet when finishing the overbraid.
In the last dialog of the Component Wizard, the new component is finished and saved to database. Two options are available therefore: the component can either be edited graphically or directly be saved to the database.
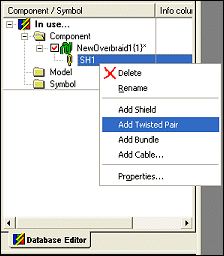
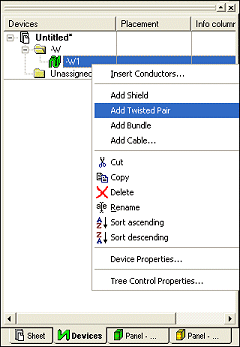
Select the Edit component graphically option, and continue cable definition on the component sheet. Using the context menu, any number of shields, twisted wires, bundles and cables can be added and saved to the database.
Example
Defining Overbraids in Project
To insert a new overbraid to the project,
-
select the Insert -> Cable command from the Main Menu bar.
The following dialog box appears:
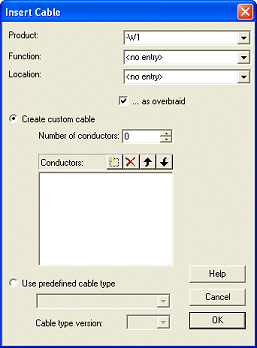
Select the ...as overbraid option to add an overbraid to the project. It is also possible to use a predefined cable type.
This option is used, when an overbraid already exists, or when an existing cable type is to be used as basis for the new overbraid. After activating the option, the drop-down list becomes active and displays all cable types available in the database and in the project for selection. The list shows all overbraids defined in the database, when the ...as overbraid option was checked first.
After inserting the overbraid, any number of shields, twisted wires, bundles and cables can be added to the cable using the context menu.
Example
Note
It's possible to add an overbraid to another overbraid or assembly, i.e. overbraids can be nested:
-
Overbraids can only be added to overbraids that can be extended. This means the overbraid doesn't have a cable type assigned or it consists of only one bundle that is described in the database.
-
Overbraids can also be added to and be part of assemblies.