
Component Wizard - Connector
The first step of the Component Wizard, the Identification dialog and the second step, the Properties dialog have already been modified.
The third step (when creating a Connector, a Connector with inserts or a Feed-through connector) is to define the structure of the new component in the Connector Structure dialog.
The following steps have to be gone through on defining the connector's structure:
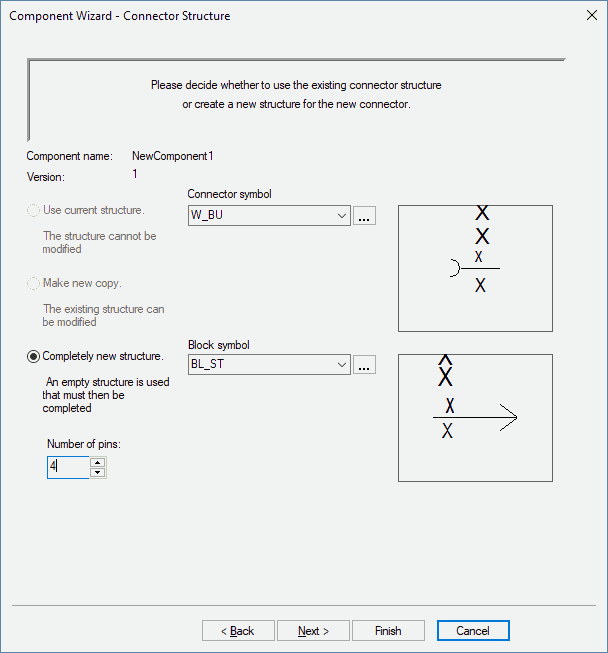
Component Wizard - Connector Structure
The next step on creation of a new connector is the Component Wizard's Connector Structure dialog.
|
Component Wizard - Connector Structure |
|
|---|---|
|
Component name |
Displays the new component name defined in the Identification dialog. |
|
Version |
Displays the new component version defined in the Identification dialog. |
|
Use current structure The structure cannot be modified. |
This option remains inactive when creating a completely new component (connector), without using attributes and structure of an already existing one.
If an existing component (connector) was selected to 'use the Attributes and Structure of', this option is active.
NoteIf, after having saved the new component, any structural changes have to be done for another component which uses the same structure, (e.g. changes on pins, pin number, symbol assignment, model assignment, ...) they will affect all other components that use this structure.
Following component properties only affect the changed component without inheriting their properties to other components (with same structure):
If the current structure is to be used the component can be saved to the database directly without further steps. Changing this structure, however, will affect all components using this structure. |
|
Make new copy The existing structure can be modified. |
This option remains inactive when creating a completely new component (connector), without using attributes and structure of an already existing one.
If an existing component (connector) was selected to 'use the Attributes and Structure of', this option is active.
If a new copy is made, this can be changed anytime without having an effect on other components. |
|
Completely new structure. An empty structure is used that must then be completed. |
This option defines that a new structure has to be created for the new component (connector). |
|
Number of pins |
This options is available when creating a 'normal' Connector and a Connector with inserts. Defines the number of pins / connector inserts available for the new connector.
This option is only active, if Completely new structure has been checked.
NoteFor connectors that do not have pins, the following applies:
|
|
Number of symbols |
This option is available when creating a Feed-through connector. Defines the number of symbols representing the pins of the feed-through connector.
This option is only active, if Completely new structure has been checked. |
|
Connector symbol |
This option is only available when creating a 'normal' Connector and a Feed-through connector.
The connector symbol has to be defined. The drop-down list contains all symbols available in the database, which have been defined as symbols of type 'connector'.
If the new connector is based on an already existing one (activating the New command on an already existing connector in the Database Window's Component tab), the Connector symbol field displays the defined connector symbol of the existing connector, which can be modified. |
|
Default Insert |
This option is only available when creating a Connector with inserts.
Defines a default insert for this cavity (a drop-down list is available containing all connectors from the database). |
|
Block symbol |
This option is only available when creating a 'normal' Connector.
The block symbol has to be defined. The drop-down list contains all symbols available in the database, which have been defined as symbols of the type 'block connector'.
If the new connector is based on an already existing one (activating the New command on an already existing connector in the Database Window's Component tab), the Block symbol field displays the defined block symbol of the existing connector, which can be modified.
As soon as a connector is dragged over a block's border in project, the symbol changes into the defined block symbol. If no block symbol has been defined for a connector, the connector cannot be assigned a block. |
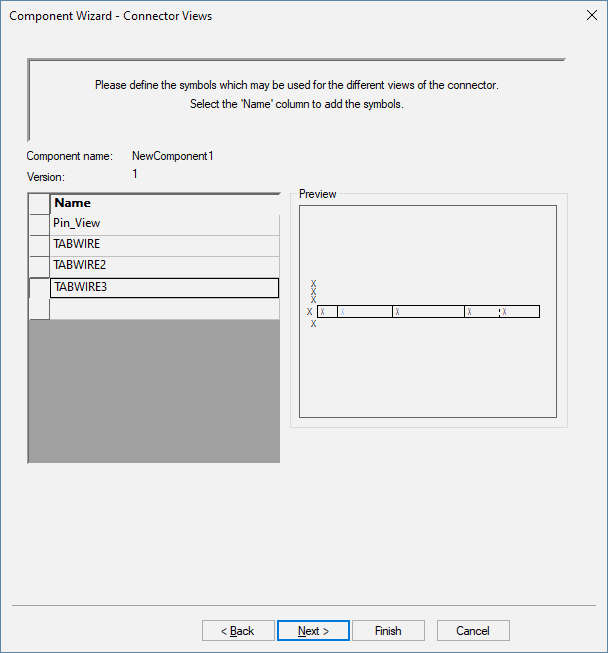
The next steps in the connector creation is to define the Connector Views. The symbol for additional views of connectors can be defined in this dialog.
Note
Connector views can only be defined for 'normal' Connectors and Feed-through connectors.
Component Wizard - Connector Views
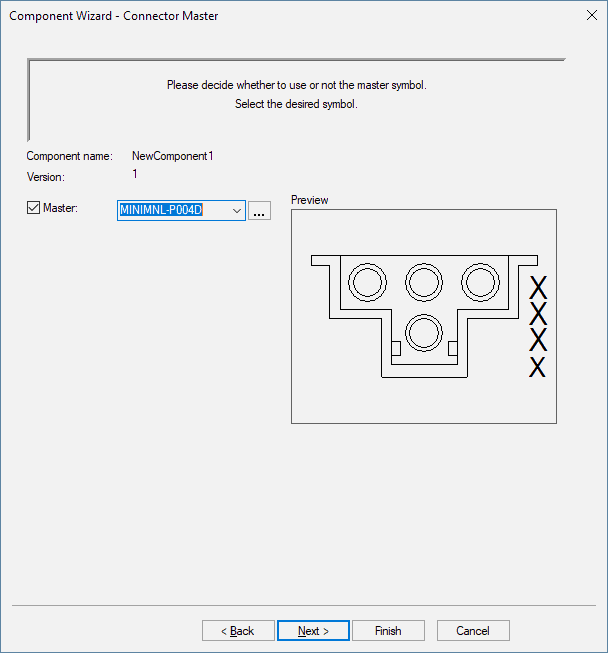
The following step is to define the Connector Master. (valid for all kind of connectors)
Component Wizard - Connector Master
The master symbol represents the connector in the Preview window of E3.series and in the drawing.
|
Component Wizard - Connector Master |
|
|---|---|
|
Component name |
Displays the new component name defined in the Identification dialog. |
|
Version |
Displays the new component version defined in the Identification dialog. |
|
Master |
A master symbol can be selected from a drop-down list. If no master symbol is selected, the master slave relationship can be defined later on.
If the new connector is based on an already existing one (activating the New command on an already existing connector in the Database Window's Component tab), the 'base' connector's master symbol is displayed in the Master field and can only be changed, if Completely new structure or Make new copy has been checked in the Connector Structure dialog. |
For detailed information on definition and arrangement of the connector symbols of 'normal' connectors, please refer to Connector Symbol Definition.
For more information on connectors with inserts or feed-through connectors, please refer to Special Connector Types.
The next step of creating a new connector is also the last step. Creation of a new connector can be completed in the Component Wizard's Complete dialog.