Locking Objects Against Modification
General Information
Regarding the manufacturing release of a function or harness it may be useful to prevent objects from being modified. This is possible for objects such as sheets, devices, cables, conductors, blocks using the Lock Objects command. To unlock these objects, the Unlock Objects command is available.
Note
Graphic elements cannot separately be locked. To lock graphic elements, the complete sheet must be locked. Another possibility is to set graphics to a certain "read-only" level that cannot be edited. This can be defined in Settings -> Graphic by checking the Use read-only level option and defining the desired color and level.
To lock objects, proceed as follows:
-
Right-click on an object on the sheet and select the Lock Objects command from the displayed context menu, or
-
right-click on an object in the tree view and select the Lock Objects command from the displayed context menu, or
-
right-click on an object in a table and select the Lock Objects command from the displayed context menu.
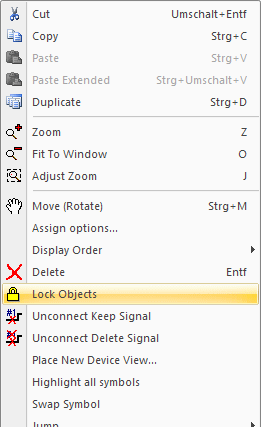
If an objects is locked, all 'sub-objects' are also locked. For example:
-
Device -> symbol -> pin -> signal
-
Sheet -> all objects placed thereon
Note:
Nevertheless, a view of placed devices on locked sheets can still be created.
-
This functionality is not available when the original device is located within a locked structure node.
-
On locked sheets, new views can only be created from the tree view.
-
-
Cable -> all conductors -> signal
-
Folder in the Device tree -> all devices contained
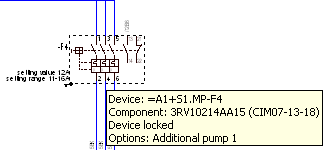
The tooltip on locked objects in the drawing displays a hint saying the object is locked:
Note
Devices placed on locked sheets cannot be modified.
However, device views can be modified, even if the device itself is placed on a locked sheet, only the device view to be modified must be placed on an unlocked sheet.
In this case, changing the device name and existing attributes is limited.
To unlock objects, proceed as follows:
-
Right-click on a locked object on the sheet and select the Unlock Objects command from the displayed context menu, or
-
right-click on a locked objects in the tree view and select the Unlock Objects command from the displayed context menu, or
-
right-click on a locked object in a table and select the Unlock Objects command from the displayed context menu.
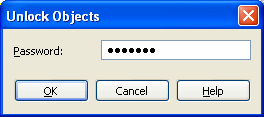
In case a password is defined, this is required for unlocking:
Remarks
-
If the command is executed on a sheet, all objects placed on the sheet are also locked / unlocked.
-
If the command is executed on a device that is part of an assembly or overbraid, only the device or wire itself is locked / unlocked.
-
If the command is executed on an assembly or overbraid in the Database tree view, all devices / wires of the assembly or overbraid are locked / unlocked.
Notes for locking structure nodes
- All directly locked objects underneath a structure node remain directly locked when unlocking a structure node.
- If a structure node is directly or indirectly locked, attributes on the structure node or underneath the structure node cannot be edited.
- It's not allowed to create new elements (sub nodes/sheets/devices) underneath a locked structure node.
- Moving and inserting actions are not permitted on locked structure nodes.
Password to Unlock Objects
It is possible to define a password that is required to unlock objects.
Using the Password for unlocking objects section under Tools -> Settings -> General -> Locking a new password can be defined or an old one changed:

A new password can be defined in the corresponding field New password. This new password must be confirmed under Confirm password. In case no confirmation is done or the entry differs, a corresponding message appears saying that the password doesn't match.
When a password has already been defined for a project, this can only be changed if the old password is entered in the Old password field.
Only then are the New password and Confirm password fields activated.
When the entries in theses two fields are deleted, i.e. when these fields are empty, the password is reset.
Displaying Locked Objects
Locked objects are marked by a corresponding symbol in the drawing, i.e. a key symbol is displayed next to the locked object. When a complete sheet is locked, the background of the locked sheet is grayed out.
Locked objects in the tree views, tables and properties dialogs are also grayed out.
When exporting to other formats, the key symbol for identifying locked objects is not output.
The Settings dialog offers the Mark locked objects option to define for example whether to show or hide the key symbol identifying locked objects when displaying in the drawing or printing.
Allowing to Change Item Designation of Locked Devices
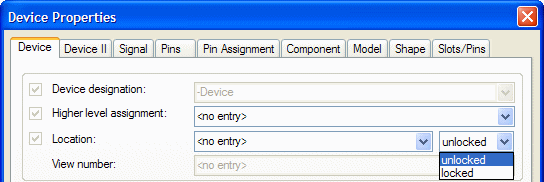
Despite being locked, it is possible to afterwards modify individual item designation elements on locked devices. These elements, however, must first correspondingly be defined in Tools -> Settings -> Configuration Database in Database Editor mode.
The definition can be done using the following options:
-
This setting allows whether changes may be done to locked devices in project mode. However, only those parts of the device's item designation can be modified that are activated by the corresponding checkbox under Changeable when locked.
-
Allow change of lock behavior
This setting defines whether it's allowed to change the lock behaviour.
Note
After having configured the Settings, the changes are saved to database. Regarding existing projects, the Update configuration in project command must be executed in Project mode.
Example
|
|
|
Setting in DBE |
Result in Device Properties of locked device |
|---|---|---|---|
|
|
Locked Device |
|
|
|
|
Changeable when locked |
Allow change lock behavior |
|
|
1st case |
|
|
The Device Designation cannot be edited. The lock behavior cannot be changed. |
|
2nd case |
|
|
The higher level assignment can be edited. The lock behavior cannot be changed. |
|
3rd case |
|
|
The location designation can be edited. The lock behavior can be changed. |
Allowing to Change Certain Attributes of Locked Devices
Despite being locked, it is possible to afterwards modify individual attributes on locked devices. These attributes, however, must beforehand correspondingly be defined in Edit Attribute Names (definable in Database Editor mode under Format -> Attribute Names...).
The definition is done using the checkboxes in the columns Changeable when owner is locked or Allow change of lock behavior:

-
Changeable when owner is locked
When this checkbox is active, it's possible to control whether the attribute's value can be changed although the owner is locked at that time.
Note:
By default, the checkbox is inactive, this means the attribute cannot be changed with the owner being locked.
-
Allow change of lock behavior
This option is used to control whether the behavior defined with Changeable when owner is locked may be changed by the user for individual attributes in the project.
Note:
By default, the checkbox is inactive, this means the user cannot change the lock behavior for individual attributes.
Note
The checkboxes in both columns are active only if
-
it's not a system-generated attribute;
-
the attribute has assigned at least one of the following owners:
-
Device
-
Block device
-
Block connector
-
Cable
-
Hose/Tube
-
Connector
-
Example
Definition in the 'Edit Attribute Names' dialog:

Result in 'Device Properties' of locked device:

-
1st case: The value of 'Attribute00' cannot be edited in the column Entry. The lock behavior cannot be changed.
-
2nd case: The value of 'Attribute01' cannot be edited in the column Entry. The lock behavior can be changed.
-
3rd case: The value of 'Attribute10' can be edited in the column Entry. The lock behavior cannot be changed.
-
4th case: The value of 'Attribute11' can be edited in the column Entry. The lock behavior can be changed.
Note
When the option Allow change of lock behavior is activated for an attribute, this is represented in the 'Device Properties' in the first cell of the corresponding attribute by the # character.
Lock Attribute
To lock an attribute
-
right-click on the cell showing the # character of the desired attribute and select the command Lock Attribute from the displayed context menu.

Unlock Attribute
To unlock an attribute
-
right-click on the cell showing the # character of the desired attribute and select the command Unlock Attribute from the displayed context menu.

Locking the Project Structure
To prevent unintended changes to the project structure, the project structure can be locked or unlocked once again in E3.series.
To do so, there are the context menu commands:
-
Lock Structure

-
Unlock Structure

The following actions cannot be executed if the project structure is locked:
-
adding structure nodes
-
deleting structure nodes
-
renaming structure nodes
-
moving structure nodes
To lock the project structure
-
right-click on the project name in the tree view
-
select the context menu command Lock Structure
Note:
If the structure is locked, this is displayed by a lock on the project node.
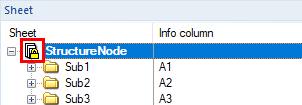
To unlock the project structure
-
right-click on the project name in the tree view
-
select the context menu command Unlock Structure
Note:
If the structure is unlocked, no lock appears on the project name.
Note
The project structure can also be changed indirectly, for example, by:
-
changing the attribute values used for the structure
-
importing a subcircuit
-
copying and pasting
-
merging a clipboard with the project
-
adding devices by placing from Component Tree
If there is a change to the project structure, this change is undone. A corresponding message appears in the Output Window.