
Connection Table
To be able to quickly and easily edit all connection of a drawing also in larger amounts, a connection table exits.
All unique connections are listed, i.e. those connections that are unique in the schematics, or those on which a conductor or a cable, hose/tube or wire is placed.
What is more, data from the Pin Table can be transferred to the Connection table using Drag&Drop.
Displaying the Connection Table
After selecting the command View -> Connection Table, a table appears, in which each row describes an object contained in the project (e.g. connections, conductors/wires, hoses/tubes and cables).
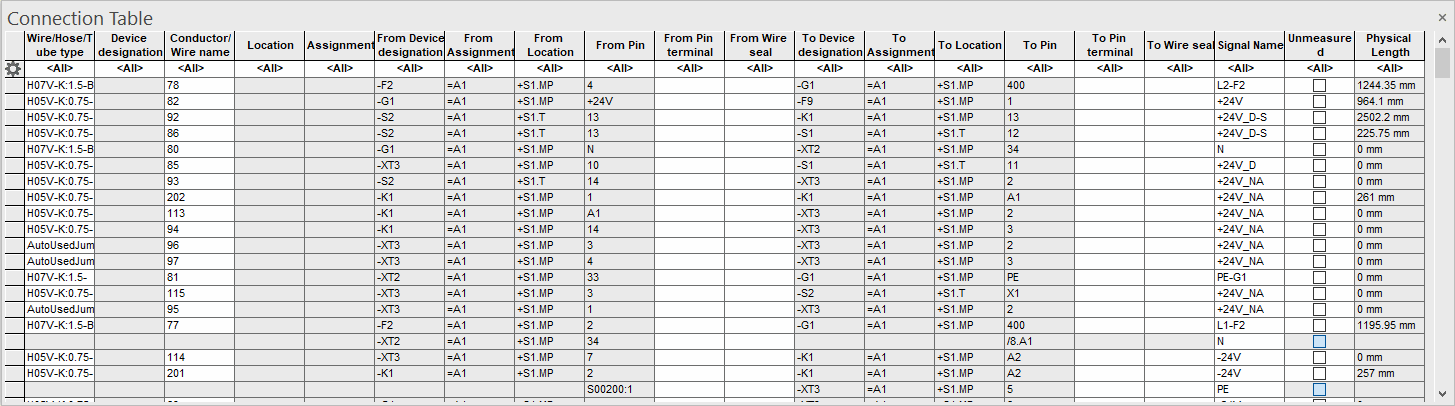
The rows contain the following information
-
Wire/Hose/Tube type
-
Device designation
-
Conductor/Wire name
-
Location
-
Assignment
-
From Device designation
-
From Assignment
-
From Location
-
From Pin
-
From Pin terminal
-
From Wire seal
-
To Device designation
-
To Assignment
-
To Location
-
To Pin
-
To Pin terminal
-
To Wire seal
-
Signal name
-
Unmeasured
-
Physical length - the length can be modified manually, if Unmeasured is set
-
All attributes with the corresponding owner can also be defined as columns. The Add column command allows adding a column for the view that graphically displays the connection. It's possible to filter by and search for these views. Connections that are not graphically represented (i.e. without wires) are valid in all views.
See also: Display Attributes in Additional Columns
'Jump to' Command on Connections
The 'Jump to' functionality enables objects that have already been placed in the drawing to be changed quickly and easily. It's possible to jump from the Connection Table to the desired object on the sheet, to jump from the connection to the Connection Table, or to jump to placed wire, conductor, hose or tube from the Connection Table to the Project Tree.
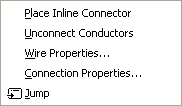
Select the desired row in the Connection Table, right-click in the left-hand margin and select Jump to open the desired sheet, on which the connection is located. The desired connection is highlighted on the sheet.
To jump to the Project tree view from the placed wire, conductor, hose or tube,
-
right-click on the desired connection in the Drawing Area and select the Jump to -> Jump to Structure command from the displayed context menu.
The Jump to Connection Table command opens the Connection Table if it is not already opened. Furthermore, the corresponding row is opened and activated.
Creating New Connection By Dragging&Dropping Pin or Disconnecting Existing Connection
There are two ways to create a new connection, in which
-
pins from the Pin Table are dragged onto the connection rows using Drag&Drop or
-
pins from the Database tree view are dragged onto the connection rows using Drag&Drop.
To drag pins from the Pin Table onto the Connection Table using the Drag&Drop functionality, select the entire row, move the cursor until a gray rectangle is displayed.
See example:
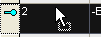
Drag the row into an empty row in the Connection Table. The target pin is also dragged from the Pin Table or the Database tree view into the Connection Table using the Drag&Drop functionality. As target the field of the 'To Device' or 'To Pin' row of the desired line should selected.
To connect the connection, the wire defined in the section Used Wire Type under Settings -> Connection -> Conductors/Wires is automatically placed. This wire receives no cross-section check.
An existing connection can be disconnected by dragging a new pin from the Pin Table onto an existing pin in the Connection Table. Thus the new pin is swapped for the existing pin. The pin that was swapped can be used again for a new connection.
Note
-
To generate a new row, "drop" the desired object underneath the last row in the Connection Table using Drag&Drop.
-
The Drag&Drop functionality from the Connection Table to any other table is not supported.
Inserting Connectors and Terminals Using Drag&Drop
There are two ways to insert new connectors and terminals directly in the Connection Table. To do so, proceed as follows:
-
select the desired object (i.e. a connector or terminal) in the Database tree view and drag onto the Connection Table using Drag&Drop or
-
select the desired object's row (i.e. a connector or a terminal) in the Pin Table and drag onto the Connection Table using Drag&Drop.
It's possible to disconnect a connection in the Connection Table by inserting an inline connector or a terminal. Therefore, a new row exists in the Connection Table and the "end pin" of this connection is moved onto this row. When inserting an inline connector, one end of the connector is entered instead of the "end pin", and the other end of the inline connector (counter part) is entered as the "start pin" in the new row.
When inserting a terminal, this terminal is entered as the "end pin" of the first row and the "start pin" of the new row.
The wire or cable on the connection is duplicated.
Note
-
To generate a new row, "drop" the desired object underneath the last row in the Connection Table using Drag&Drop.
-
The Drag&Drop functionality from the Connection Table to any other table is not supported.
Placing Inline Connectors and Disconnecting CoresConductors or Hoses/Tubes and Changing Connection Properties
To place an inline connector,
-
select the desired row (i.e. connection, cable, conductor or wire) in the Connection Table, right-click in the row's left-hand margin and select the command Place Inline Connector.
-
Afterwards, the Place Inline Connector dialog opens, in which the desired component or symbol to be used for placing the inline connector is selected.
Note
When selecting rows that display conductor/wire connections and rows that do not display conductor/wire connections, only the conductors/wires are unconnected. This happens analog to the handling on the sheet. When selecting rows that do not display conductor/wire connections, the Place Inline Connector command is active only when all pins have the same view number.
To disconnect conductors or hoses/tubes,
-
select the desired row in the Connection Table, right-click in the row's left-hand margin and select the command Unconnect Conductors or Unconnect Hoses/Tubes from the displayed context menu. The conductor, hose or tube is completely deleted from the connection list and the drawing.
To change or display the properties of connections, conductors/wires (or hoses/tubes) and cables as always,
-
select the desired row in the Sheet Table, right-click in the row's left-hand margin and select the command Connection Properties..., Wire Properties... or Device Properties from the displayed context menu.
Easily Editing Several Cells
Cells with white background color can be edited in the Connection Table. Several cells can be selected and simultaneously changed to the same value (see Table Configuration).
To edit a cell with white background color
-
either double-click in the corresponding cell, or use F2 with the corresponding cell selected.
The following conductors can be edited in the Conductor/Wire name column:
-
Single wires
-
Conductors of dynamic cables
Any designation (name) can be defined. However, blanks are not allowed.
Example
"Wire_1"
In the Wire/Hose/Tube type column, the following conductors can be edited:
-
Single wires
-
Conductors with wire type of dynamic cables (this occurs when a wire from a wire group is inserted into the dynamic cable)
The designation (name) must be written as follows: "WireGroup:WireType".
Example
"FLY:2.0-BK"