
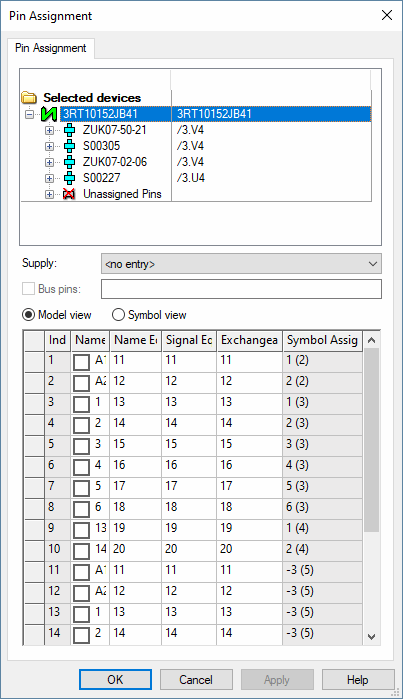
Pin Assignment
Component Pin Names can only be modified in Database Editor mode (see Database Editor).
Note
Nodes of the type Busbar can only be connected to nodes of the same type.
To display / modify pin names,
-
right-click anywhere on the sheet and select the Pin Assignment... command from the displayed context menu or
-
right-click anywhere on the sheet and select the Edit -> Pin/Conductor Assignment... -> Pins command on the Main Menu bar.
The following dialog box will be displayed:
|
Pin Assignment |
|
|---|---|
|
Supply |
Defines the supply-signal for the selected pin. It can be chosen from a drop-down list. |
|
Bus pin |
Defines the number of bus pins for the selected bus pin which represents several physical component pins.
The number of bus pins can be entered in the form 5..8. This means the pin represents 4 pins. |
|
Model view |
If this option is activated the table only lists the model pins (but not the unassigned symbol pins). Model pins possibly used in several symbols are listed correspondingly often with the same Index. |
|
Symbol view |
If this option is activated the table only displays symbol pins. All unassigned symbol pins are marked as Unassigned Pins. These can also be edited if Unassigned Pins is explicitly selected in the tree view. |
|
Index |
Is the number of the physical pin (on a model).
For components of the type 'Device' (normal component without model) the pin assignment Index column can be renumbered.
Note
|
|
Name |
Displays the pin name associated with the pin. A new name can be entered in the Name field.
The checkboxes, at the left edge of the Name column, are used to allow, or prohibit, the modification of the name of a pin. This is done by entering (or removing) a check mark in the checkbox.
This is available for all components except terminals. (see Settings->Connection -> Connectors).
In the Device Tree view, modifiable pins are indicated as follows:
When $ is defined as pin name, pin names for terminals are automatically incremented in the project.
The logic pin number must always be specified with the '$' character as pin name. |
|
Name Equiv. |
Is the name equivalence.
The value can be edited, but it must be ZERO or >10. ZERO is not equivalent. |
|
Signal Equiv. |
Is the logical pin equivalence.
The value can be edited, but it must be >0 for equivalence. ZERO is not equivalent.
|
|
Exchangeability |
Is the exchangeability of the pins.
The value can be edited, but it must be >0. ZERO is not equivalent.
The checkbox must not be active when editing the pin name as otherwise any pin text can be entered.
Exchanging does not affect the model but only the schematic symbol. |
|
This column is only displayed, if Test Point Priority is activated in the context menu of the column. |
|
|
Symbol Assignment |
This column is only displayed, if Pin number is activated in the context menu of the column. |
|
Pin Number |
Displays the existing Symbol assignment.
This column is only displayed when activating it in the context menu that is displayed when right-clicking any of the columns. |
|
Sort by pin number |
The pins are sorted by their pin number (if the pin number is identical, the pins are sorted by the gate number). Selecting again reverses the order. |
|
Test Point Priority |
The values for single pins' Test Point Priority (TPNPRIO) can be set using this option.
Using the context menu the column can optionally be faded out or in. |
|
Make equivalent |
All selected pins are made equivalent depending on their column.
The value nearest to >10 of each column is used for that process. |
|
Insert pin |
To be able to add pins, select a complete line in the grid by right-clicking in the gray box to the left, to display the context menu.
The pin is inserted after the selected pin and given the next higher available pin number. |
|
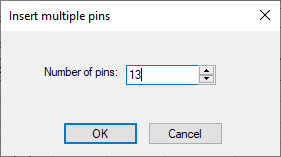
Insert multiple pins |
When editing a connector component, it is possible to enter the number of pins to be added while inserting additional pins.
Select the Insert multiple pin command from the context menu and enter the number of desired pins in the displayed dialog:
Any number of pins from 1 to 3000 can be added simultaneously. This command is only available for 'normal' pins and does not apply to power supply or backshell pins. |
|
Delete pin |
All selected rows or pins can be deleted using the context menu. Pins with higher pin numbers and pin copies are decremented.
For normal components normal pins cannot be deleted, rather only power supply pins. When normal and power supply pins are selected together, the Delete pin command is not available. |
|
Move up / Move down |
These commands are used to move pins up or down, in the list, so as to arrange them in the desired sequence.
Selecting several pins at once will move them at the same time. |
|
Insert supply pin/Delete supply pin |
If the number of the pins of a component is not yet provided by a model or it is not the desired number of supply pins, this option can be used to insert or delete supply pins. |
|
Insert backshell pin / Delete backshell pin |
Backshell pins are special pins within connectors that, for example, represent pins within housings.
This option can be used to insert or delete supply pins.
See also: Inserting Backshells |
Assignment of equivalent pins
In the project, the assignment can also take place on the individual equivalent pins.
In Database Editor mode, this is not possible on the component pin, as only pins with unique pin copy are saved in the database. This means, this definition can only be made on all component pins that have the same pin copy.
For that reason, pins with the same pin copy are output only once in the Pin Properties... dialog of the component.
Upon addition of one of the above attributes, they are assigned to all component pins with the same pin copy (at present, this applies to the .EXTERN and .INTERN attributes only).