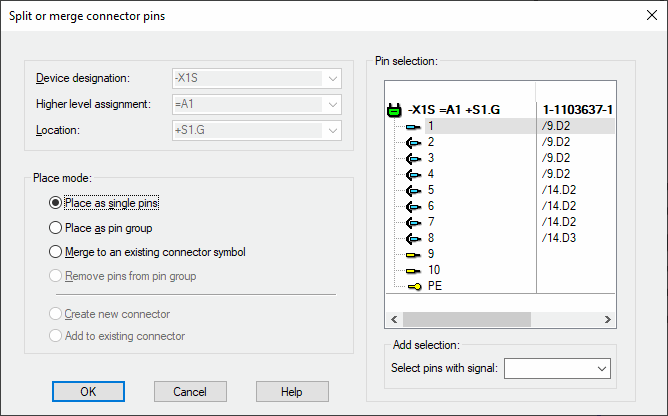
Split or Merge Connector Pins
The Split or merge connector pins dialog can be opened
-
by right-clicking on a connector symbol or block-connector symbol, if the symbol is not plugged, and activating the Split/Merge Connector Pins command from the displayed context menu.
-
In case of multiple selection, the dialog can only be activated, if all connector symbols belong to the same connector.

When a connector was created using symbols and device designation (i.e. not a component from the database), pins can be selected and split off into another connector with another Item designation.
When this is done, Connector symbol views are also taken into account.
The complete connector structure is displayed in the tree. Objects selected in the project (pins or pin groups), will also be selected in the tree.
Note
In the Tree view, plugged pins are displayed in gray.
If one of these pins is selected, the first three placement options (Place as single pins, Place as pin group and Merge to an existing connector symbol) are inactive, because it is connected to a mating connector and cannot be split or merged.
The Create new connector option is active, because pins can be assigned to another component even if they are already connected.
Pins, pin groups or the connector can be selected in the Tree view.
|
Split or merge connector pins |
|
|---|---|
|
Device Designation/Higher Level Assignment/Location |
These options are only active, if Create new connector has been checked.
It can be necessary to specify other designations, because, when assigning a connector (only symbols with item designation) to another device, its views have to be considered as well. |
|
Placement mode |
This option defines the action to be taken for the selected pins when closing the dialog box using OK.
The pins are taken out of their pin groups. When the last pin of a symbol is taken out, the symbol itself will be deleted. Existing connection lines are split off and the connection remains as 'open-ended' connection.
If conductors have been connected to the pins, these are moved along with the pin. |
|
Place as single pins |
The pins may be placed as individual pins. |
|
Place as pin group |
The pins may be placed as a pin group. |
|
Merge to an existing connector symbol |
By placing the pins on a pin/pin group symbol of the same connector, they can be joined to its pins. No new symbol is placed.
For simplified display of connectors, it's possible to display pins of different devices in one symbol. This is possible for individual connectors and also for several connector pins.
Therefore, a special pin group is available similar to 'pin views'. These groups exist besides the 'normal' display and can be generated as often as desired.
A pin group can be generated by using Drag&Drop from within the Device or Database tree view, or, when the connector is already placed, using the Merge to an existing connector symbol option.
|
|
Remove pins from pin group |
Already placed pins can be removed from the pin group. |
|
Create new connector |
Activate this option to create a new connector.
A new connector with the specified item designation is created and all selected pins with their views, are removed from the existing connector and added to the new one.
This option is active only if the action can be accomplished for all pins (original and views). |
|
Add to existing connector |
If this option is activated, the name of the desired connector can be defined. This connector, however, can only be merged to another connector not bearing a component code.
The drop-down list next to Device Designation displays all available connectors without component code.
If a device designation was selected, this connector will be merged to an existing connector. |
|
Add selection |
This option allows you to select all pins with a specific signal. |
If the pin selection contains plugged pins, the command cannot be executed.
An error message will be displayed
Invalid pins selected - plugged pins cannot be split
and the dialog box is not closed.