
Insert Dimension
The E3.series program calculates the distance between the first two digitised points and inserts the dimension at the third point.
To insert a dimension,
-
select the Insert->Dimension on the Main menu bar, or
- click on the symbol Dimension
 in the graphic toolbar or
 -
select the hotkey M.
When the mouse is moved over an object that can be dimensioned automatically, the cursor changes shape.
Clicking on the left mouse button starts the dimension at that point.
Move with the cursor away from the start point and left-click again, at the end point of the dimension, then move the cursor to the position at which you want the dimension text to appear and left-click to display the dimension.
The following objects/elements can be dimensioned in the schematic:
-
all graphic elements (grouped graphic, graphic lines, polygons, rectangles, circles etc.)
-
pins
-
fields and dynamic symbols (snap points: center points and corners of the outline)
-
connect lines (snap points: end points)
The following objects/elements can be dimensioned in the panel:
-
all graphic elements (grouped graphic, graphic lines, polygons, rectangles, circles, etc.)
-
models (snap points: center points and corners of the outline, center of the model and pins)
-
mounts and cable ducts (snap points: center points and corners of the outline, center of the object)
-
fields and dynamic symbols (snap points: center points and corners of the outline)
-
drills/drill holes and restricted areas (snap points: center points and corners of the outline)
Normally, dimensions between two points are drawn and calculated horizontally or vertically. In order to create a dimension other than vertical or horizontal, hold down the Shift key while moving the cursor.
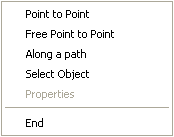
To select another dimensioning method, activate the Dimension command, then click on the right mouse button to display the following menu:
|
Insert Dimension |
|
|---|---|
|
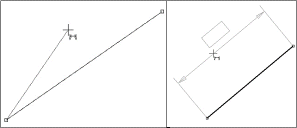
Point to Point |
Point-to-point dimensions can only start and end on valid objects, e.g. end point of a line.
Example
|
|
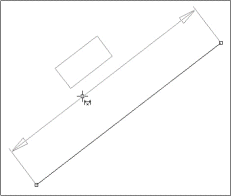
Free Point to Point |
Free point-to-point dimensions can start and end at any position on the drawing. This type of dimension has handles at the base points that allow for modification by simply moving the base point(s).
Example
|
|
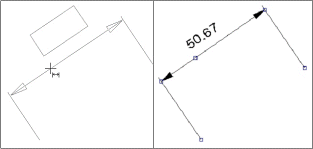
Along a path |
Dimension lines can automatically run along graphic outlines (also curves) or the connect line (also curved connections).
To define the dimension's start point left-click on the desired position. To specify the end point drag the mouse to the desired end position and again left-click. Then place the dimension text where desired by again left-clicking.
Example
|
|
Select Object |
This option is only available for lines.
Start and end point for the dimensioning are found automatically upon selection of an object.
Example
|
|
End |
Exits dimensioning mode. |
Dimensions can be added to graphic objects or devices. The dimensions are dynamic, i.e. the dimension values are automatically modified when the object is changed.
The default size for the dimension text can be defined in the Tools->Settings->Dimension->Text menu.
To modify dimension text, right-click the dimension and select the Dimension Properties command from the displayed context menu.
In Database Editor mode, dimensions cannot be saved. They are only used for constructional assistance.
Note
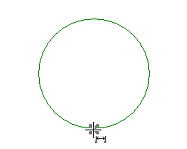
Dimensioning circles
-
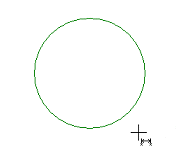
Select the Insert -> Dimension command from the Main Menu bar or select hotkey M with the cursor placed outside the circle (Example: 1st step),
-
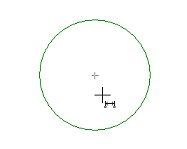
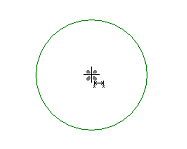
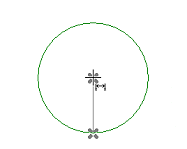
move the dimension cursor into the circle (Example: 2nd step) over the circle's center (Example: 3rd step). The start point is identified by a cross.
-
Without clicking on the center, move the cursor to the circle's circumference (top, bottom, right or left) and left-click as soon as the dimension cursor's cross is displayed (Example: 4th step).
-
Move the cursor back to the circle's center and left-click on the center as soon as the dimension cursor's cross is displayed (Example: 5th step).
-
Then drag the dimension as desired (Example: 6th step).
Example
1st step
2nd step
3rd step
4th step
5th step
6th step
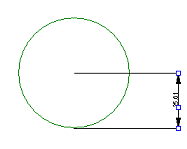
A circle's dimension corresponds to its radius.
Dimensioning Rectangles/Polygons
When dimensioning a rectangle or a polygon, the start point can either be any corner or the center of a side.
Start point:
corner

Start point:
center

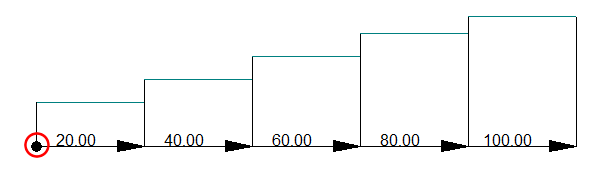
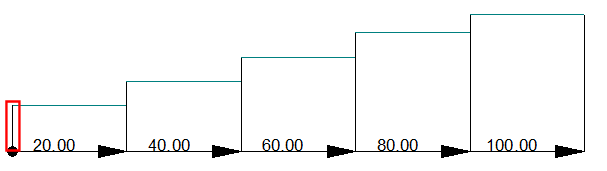
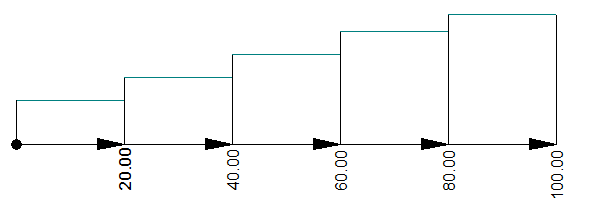
Insert Running Dimension
It is possible to define running dimensions using several reference points.
To insert a running dimension
- select the command Insert -> Running Dimension in the main menu, or
- click on the icon
 Running Dimension in the Graphic toolbar
For determining the dimension's starting point left-click on the desired location.
For additional reference points simply left-click on the desired locations.
The dimension texts are
Note
The filled circle denotes the starting point and reference point of the dimension. From there the individual length specifications are calculated:
To delete a running dimension
Parts of a running dimension can be individually deleted.
Select the desired elements of the running dimension by left-clicking and pressing the SHIFT key and then press the DEL key.
To select all parts of the running dimension, left-click directly on the first extension line at the starting point:
The dimension text of running dimensions can be rotated by 90° to the dimension line:
For this, activate the check box Rotate texts of running dimensions:.
This setting can be defined
- by default for all running dimensions (within the Settings under Tools -> Settings -> Dimensions in the area Text)
- for the currently selected dimension also afterwards (via Dimension Properties - Dimension in the area Text)