
Insert and Delete Contours
Restriction areas and drill-holes can be added to a model once you have defined its graphics.
To add a new restriction to a model,
-
In Database Editor mode, select the Insert->Contour... command on the Main Menu bar, or
-
select the
 icon on the Database Model Toolbar.
The following dialog box will be displayed.
|
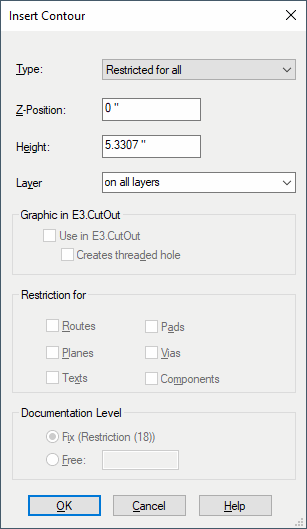
Insert Countour |
|
|---|---|
|
Type |
Defines the restriction's type and properties:
|
|
Z-Position |
Defines the Z-coordinate referring to the component's origin. |
|
Height |
Defines the height of the restriction (in the Z-axis). |
|
Layer |
This option is only important for PCB layout systems.
Defines the restriction's layer.
Layers on which the restriction is to be affected:
|
Graphic in E3.CutOut |
|
|
Use in E3.CutOut |
Defines whether to use contours of the type Cutout area or Drill-hole for the additional tool E3.CutOut.
NoteThis option can be activated only with contours of the type Cutout area or Drill-hole. |
|
Creates threaded hole |
When this checkbox is activated, a threaded hole is generated on the model's reference object upon manufacture.
NoteThis option can be activated only if the contour type Drill-hole is selected and the contour is used in E3.CutOut. |
|
The following two options are only active, if the Restricted by mask type was selected and are only important for PCB layout systems. |
|
|
Restriction for |
Restrictions can be set for routes, planes, texts, pads, vias and/or components.
|
|
Documentation Level |
Defines the restriction's documentation level.
The level can either be set as Fix (Restriction (18)) or freely be chosen by activating Free and entering the desired level. (The allowed level can range from 28 to 29.999.) |
Deleting Contours
To delete contours, start Database Editor.
Then edit a model containing contours to be deleted.
Select the desired contours either on the sheet or in the tree view, right-click to open the context menu and select the command Delete.
Note
The command is only available, when all selected objects can be deleted.