
Database Configuration
The Database Configuration Wizard guides you through the configuration of the databases for your E3.series project. Once the databases have been set up, they can be easily accessed through the Select Database command.
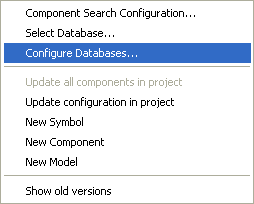
The Configure Databases... command is selected
-
on the object menu that is displayed when right-clicking on the Component or Symbol View, in the Database Window, or
-
on the object menu that is displayed when right-clicking on the top horizontal bar of the Database Window or on the header of one of the columns in the Database Window.
The Configure Databases dialog box is displayed:

|
Configure Databases |
|
|---|---|
|
Data source |
Displays the 'data source' and depends on the OLE DB Provider selected, i.e. it may be a file, a server name etc.. |
|
Provider |
Displays the OLE DB Provider of the 'data source', e.g. ORACLE, SQL Server, JET. |
|
Initial catalog |
This column is only important when selecting SQL Server as provider. Displays the database within SQL Server. |
|
Table schema |
This column is only important when selecting ORACLE as provider. Displays the user having created the tables for E3.series. |
|
Description |
The description field displays additional information referring to the 'data source'. |
|
Add... |
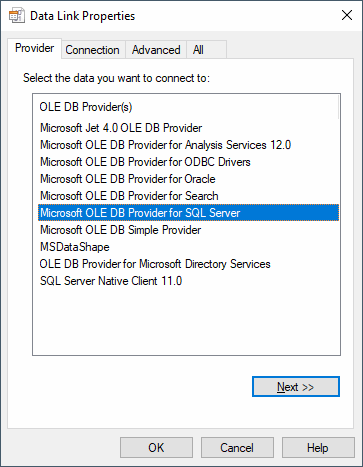
When new databases are Added the system dialogData Link Properties is displayed which allows to select the data required for database connection.
The Database Configuration Wizard dialog to configure a new database for E3.series will be displayed subsequently. |
|
Remove |
This button removes the selected database. It can no longer be used in E3.series. |
|
Configure... |
Starts the Database Configuration Wizard to configure the selected E3.series database and indicate additional information. |
Configure Database Wizard
To start the 'Configure Database Wizard', click Add... or Configure... in the above dialog box.
To configure a database, proceed as follows:
-
Select Configure in the above dialog box.
-
The first step of the Wizard consists of specifying description and table schema. When the Next button is clicked, the system checks, on the basis of the information given, which tables exist in the database.
-
If the table is complete (component, symbol or configuration) or if it is a configuration database, the last Wizard page is displayed. Otherwise, the next step (Wizard - Select related databases) consists of defining the configuration database and, if required, the related component- or symbol database(s). The drop-down lists display only databases that may contain the missing data.
-
The last page of the Wizard gives a summary of all entries. Missing entries are indicated by <no entry>.
When adding a Microsoft Access database, proceed as follows (the procedure depends on the database type: Access, SQL or Oracle):
To add a Microsoft Access database, proceed as follows:
-
Select the
 button (in the Settings -> General -> Language dialog) or click Add... (in the Configure Databases dialog) to select the desired database.
 -
Switch to the Provider tab to select the appropriate OLE DB Provider for the database type to access to. Select the Microsoft Jet 4.0 OLE DB Provider type for the database and click Next >>.
-
The Connection tab appears, which specifies how to connect to Microsoft Access data. This tab is provider-specific and displays only the connection properties required by the OLE DB Provider for Microsoft Jet.
In the Database name field, type the Microsoft Access database (.mdb) file name that you want to access. To browse for the file, click the
button. -
Then define the User name and the corresponding Password, that are used for authentication when you log on to the data source.
The Blank password option enables the specified provider to return a blank password in the connection string.
The Allow saving password option allows the password to be saved with the connection string. Whether the password is included in the connection string depends on the functionality of the calling application.
Note:
If saved, the password is returned and saved unmasked and unencrypted.
Then click Test Connection to attempt a connection to the specified data source. If the connection fails, ensure that the settings are correct. For example, spelling errors and case sensitivity can cause failed connections.
-
Click OK to activate the selected database.
To add a Microsoft SQL database, proceed as follows:
-
Select the
button (in the Settings -> General -> Language dialog) or click on Add... (in the Configure Databases dialog) to select the desired database. -
Switch to the Provider tab to select the appropriate OLE DB Provider for the database type to access to.
-
Select the Microsoft DB Provider for SQL Server type for the database and click Next >>.
-
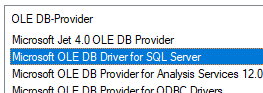
To use a TLS 1.2 coding for the communication between client and server, select the Microsoft DB Driver for SQL Server type and click Next>>:
Note:
The Microsoft OLE DB Driver for SQL Server provider is only available if the driver is installed.
-
-
The Connection tab appears, which specifies how to connect to Microsoft SQL Server data. This tab is provider-specific and displays only the connection properties that are required by the OLE DB Provider for Microsoft SQL Server.
-
Select a server name from the drop-down list, or type the location of the server where the database you want to access is located. Selecting the database on the server is a separate action. Refresh the list by clicking Refresh.
-
Enter information to log on the server. Click the Use Windows NT Integrated security option to specify that the provider request a secure (or trusted) connection to a SQL Server running on Microsoft Windows NT. When selected, SQL Server uses integrated login security to establish connections using this data source, regardless of the current login security mode at the server. Any login ID or password supplied is ignored. The SQL Server system administrator must have associated your Microsoft Windows network ID with a SQL Server login ID.
Or click the Use a specific user name and password option to use a supplied user name and password to authenticate your logon information to the data source.
The Blank password option enables the specified provider to return a blank password in the connection string.
The Allow saving password option allows the password to be saved with the connection string. Whether the password is included in the connection string depends on the functionality of the calling application.
Note:
If saved, the password is returned and saved unmasked and unencrypted.
-
Select the database on the server. Use one of the following methods:
-
Type the database name that you want to access.
-
For SQL Server 7.0, attach an SQL database file as a database name. Type the database name to use for the attached SQL database file.
-
For SQL Server version 6.5 and earlier, type the database file name to attach. Then type the name of the single-file database file. to browse for the file, click the
button. -
Then click Test Connection to attempt a connection to the specified data source. If the connection fails, ensure that the settings are correct. For example, spelling errors and case sensitivity can cause failed connections.
-
Click OK to activate the selected database.
-
-
To add an Oracle database, proceed as follows:
-
Select the
button (in the Settings -> General -> Language dialog) or click on Add... (in the Configure Databases dialog) to select the desired database. -
Switch to the Provider tab to select the appropriate OLE DB Provider for the database type to access to. Select the Oracle Provider for OLE DB type for the database and click Next >>.
-
The Connection tab appears, which specifies how to connect to your data using an OLE DB provider. this tab is provider-specific and displays only the connection properties required by the selected OLE DB provider. Connection properties allow you to specify where your data is located and how to connect to the data. For more information, refer to the documentation for each specific OLE DB provider.
-
Enter the Data Source's name you want to access (typically a server name) and type the Location of the data source you want to access (typically a database name).
-
Enter information to log on to the server. Click on the Use Windows NT Integrated security option to use an authentication service to identify yourself. To use this feature, your OLE DB provider must support an authentication service. The OLE DB provider for SQL Server is an example. You also must have permissions in the data source to use the authentication service.
Or click on the Use a specific user name and password option to use a supplied user name and password to authenticate your logon information to the data source. The Blank password option enables the specified provider to return a blank password in the connection string.
The Allow saving password option allows the password to be saved with the connection string. Whether the password is included in the connection string depends on the functionality of the calling application.
Note:
If saved, the password is returned and saved unmasked and unencrypted.
-
Type in the catalog that you want to access upon connection (Enter the initial catalog to use).
-
Then click Test Connection to attempt a connection to the specified data source. If the connection fails, ensure that the settings are correct. For example, spelling errors and case sensitivity can cause failed connections.
-
Click OK to activate the selected database.
-