
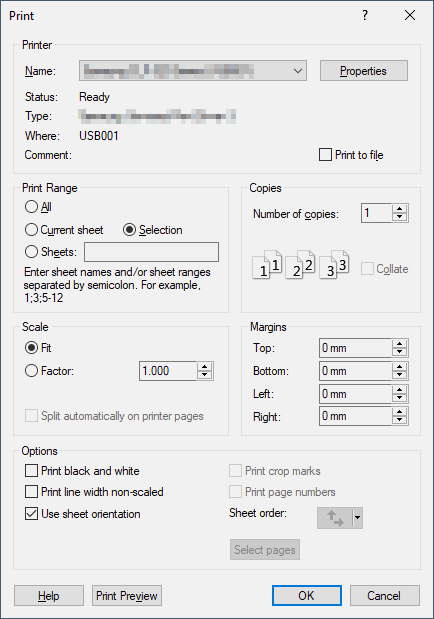
Print Dialog
To open the Windows Print dialog box
-
select File -> Print... on the Main Menu Bar or
-
use the keyboard combination CTRL+P or
-
select the Print button
 on the Standard Toolbar or
 -
right-click on a folder or an individual sheet in the Sheet View of the Project Window and select the Print... command on the displayed context menu.
When the command is activated on an individual sheet name, this sheet is already entered in the dialog box as the sheet to be printed. Activating the command on a folder name selects all sheets below that level for printing. Multiple sheets can be selected for printing by using the CTRL and/or SHIFT keys when selecting the sheets.
The following dialog will be displayed:
|
|
|
|---|---|
Printer |
|
|
Name |
Selects the printer you want to use. |
|
Properties |
Select this option to open the Printer Properties dialog box.
This dialog enables you to change additional printer-specific settings. |
|
Print to file |
Prints the sheet(s) to a file rather than to the printer. The file can be sent to the printer at a later time. |
Print Range |
|
|
All |
Select this option to print all of the sheets. |
|
Current sheet |
Select this option to print the current sheet only. |
|
Sheets |
Select this option to print one or several sheets.
In the associated text box enter the number of the sheet(s) to be printed separated by semicolons. |
|
Selection |
Use this option to print selected objects of the drawing. |
Copies |
|
|
Number of copies |
Specifies the number of copies to print. |
|
Collate |
Prints a complete set of pages, followed by another complete set of pages, and so on, until the total number of copies specified has been printed. |
Scale |
|
|
Fit/Factor |
You can either set a scale factor (Factor:) or automatically scale the drawing as large as possible within the limits of your paper (Fit:). |
|
Split automatically on printer pages |
NoteThis option can only be activated/deactivated, when a Factor was defined in the Scale section.
This button becomes active when the output is to be scaled. The pages are now spread over several pages so that the whole information can be output with the desired scale factor. |
Margins |
|
|
Top/Bottom /Left/Right |
Sets page margins for printing. |
Options |
|
|
Print black and white |
Prints all text and lines in black rather than color or shades of gray.
|
|
Print line width non-scaled |
Select this option to print lines with the width defined in E3..
With this option inactive, the lines on the DINA3 sheet, output on a DINA4 printer, would be thicker than on the DINA0 format sheet.
With this option active, the lines are always drawn with the same width (as defined in E3). This is done independent of the output's scaling. With a scaling too large and corresponding line width, it may happen that lines overlap. The printout is then no longer readable. |
|
Use sheet orientation |
Using this option, it is possible to switch from Portrait to Landscape, dependent on the sheet format. I.e. when the sheet format is wider than high, the system optionally switches from Portrait to Landscape, and vice versa.
When this option is checked (by default), the printer's setting is ignored, and the sheet orientation that corresponds to the sheet to be printed is defined.
This setting is valid for a E3.series session; when exiting E3.series, this setting is saved under HKCU\Software\Zuken\E3.series\<version>\Settings\PrintUsingSheetOrientation. |
|
Print crop marks |
Outputs crop marks on the corners of the print area. If a print area is defined on the sheet format, this is used.
Otherwise, the print area of the defined printer minus the specified margins is used.
Note: If a print area is defined on the sheet format, the output will not be cut at the defined print area. |
|
Print page numbers |
Outputs the page numbers of the adjacent sheets (left, right, above and below) in the margins outside the defined print area as well as the current page number. |
|
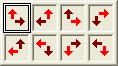
When only one sheet is output and print areas are defined for the sheet format, the sheet order can be defined (Split automatically on printer pages must be checked).
The following symbols appear in the Sheet order selection list:
The arrow direction has the following meaning:
NoteIf the sheet order has been defined for a sheet in the Database Editor (in Symbol Properties - Print Area), the sheet order can no longer be changed in the project. |
|
|
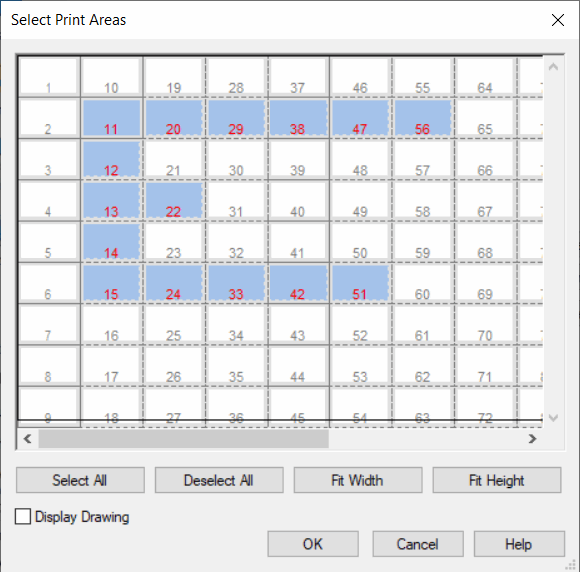
Select pages |
If only one sheet is to be output and print areas are defined on the sheet format, individual pages can be selected in the subsequent dialogSelect Print Areas:
When calling up the dialog, no pages are selected. Double-clicking on a page selects it and double-clicking again deselects it.
If the defined print area including the margins is too big for the sheet format of the currently defined printer, a corresponding message is displayed and the dialog will not open. |
|
Print Preview |
Displays each page as it will look when printed. To exit print preview and return to the drawing page, click Close. Default orientation for printing is landscape. |
Remarks on printing external or embedded documents
External and embedded documents cannot be printed directly using the File -> Print command inE3.series.
They will thus not be considered when the All option is checked. The following should be taken into consideration:
-
External documents must be opened to print them via File -> Print.
-
Embedded documents can be printed via the Explorer's context menu in the Sheet tree view.
Remarks on printing 3D panel sheets
-
The current view must already be displayed in 3D mode.
-
Printing can only be done with Current sheet or Selection selected.
If the current sheet is printed, all selected devices are output as "unselected" (i.e. the colored highlighting is not displayed). If the current selection is printed, all unselected devices are suppressed. The selected devices are printed as "unselected" (i.e. the colored highlighting is not displayed). Therefore, only the area is printed, i.e. no sheet border is visible and the sheet is adjusted to the size of the area.