
Insert Mount
This dialog is only available, if both E3.panel and a E3.cable license are present!
Mounts are special devices, used in E3.panel that can be created dynamically by the user without any definition in the database. These mounts can be created and placed on panel sheets.
If a license for E3.panel is available, mounts, that have been placed in the panel, are represented by icons displayed in the Panel Tree View of the Project Window. Also, if devices have been placed on the mount, they are displayed in a sub-tree under the mount icon.
To create a dynamic mount on a panel sheet, proceed as follows:
-
select the Insert -> Mount command from the Main Menu bar.
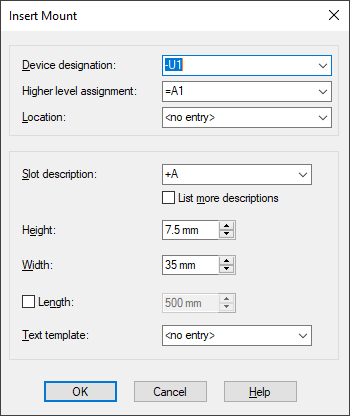
The following dialog will then appear:
|
Insert Mount |
|
|---|---|
|
Device Designation |
Defines the device designation of the mount. The dialog automatically enters the pre-defined prefix and the next available sequential mount number.
The prefix '-' cannot be modified in this dialog, as it is predefined in Tools->Settings->Placement. |
|
Higher Level Assignment |
Defines the Higher Level Assignment of the mount. It is selectable from a drop-down list or can be entered directly. All available higher level assignments in the project will be listed.
The prefix '=' cannot be modified in this dialog as it is predefined in Tools->Settings->Placement. |
|
Location |
Defines the Location of the mount. It is selectable from a drop-down list or can be entered directly.
All available locations in the project will be listed.
The prefix '+' cannot be modified in this dialog, as it is predefined in Tools->Settings->Placement. |
|
Slot Description |
The drop-down list displays all slots (mounts) that are available in the project.
It determines which corresponding devices are capable of being placed on this type of mount. |
|
List more descriptions |
Activate this checkbox to display all slots available in the project and in the database. |
|
Height |
This allows you to enter the desired height of the new mount. It can be changed after placement. |
|
Width |
This allows you to enter the desired width of the new mount. It can be changed after placement. |
|
Length |
Activate this checkbox to enter the desired length. The new mount will then directly be placed on the panel sheet upon confirmation with OK.
If the checkbox is not active, i.e. no length is specified, the new mount can be placed on the panel sheet by holding down the left mouse button and dragging the mouse to the desired position.
The new mount is placed in an orthogonal direction depending upon the direction that the cursor moves.
The slot is placed on the center line of the mount. |
|
Text Template |
Template symbols that exist in the database are selectable from the drop-down list.
They can be selected as a template for additional text information for the mount being added.
This text template is set as default symbol, i.e. it will be active again when re-opening the dialog box. |